
When it comes to connecting LED strip lights there are a few different ways to go about it. Regardless of how you choose to connect the strips together, it is important to ensure they are connected correctly so that they will function properly.
To do this we have put together this simple chart that will help you understand the various possible connections for your lighting setup.
Table of Contents
Quick Connectors:
Getting the best connection for LED Strip Lights isn’t always easy, but it’s crucial! If a connection isn’t done correctly, it can lead to lights flickering or not working at all.
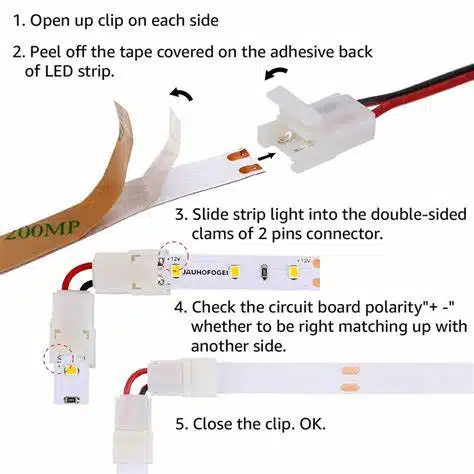
Our Quick Connectors make it a breeze to connect your LED Strip Lights without having to use a soldering iron. They work well with single color strips and RGB (color changing) strip lights.
There are two types of Quick Connectors: 2-pin LED strip connectors and 4-pin RGB (color changing) connectors. The 2-pin connectors require a two-port connection while the 4 pin connectors have connections for all of the RGB lights on the strip, making it a great option for color changing strips.
The two-pin connector is the most popular and works with 20 AWG stranded wire. The 4-pin connectors are identical in size and shape to the two-pin but have four pins which match up with the connection points on RGB (color changing) strips.
Solderless Connectors:
Using solderless connectors allows for easier installation of LED strip lights without the need to use a soldering iron.
The traditional way to connect LED strips to PCB (printed circuit board) is by soldering – however, this can be time consuming and difficult for those with no welding experience.
To connect these LED strip light clips, open the fold-over clip and slide in the LED strip, ensuring the copper pads are in contact with the metal tongs and that the positive and negative wires correspond correctly (‘red’ to ‘+’ and ‘black’ to ‘-‘). Close down the clip cap and the connection is made.
Power Supply:
When you connect LED strip lights to a power supply, it is important to choose the right one. This will ensure that your strips work properly and safely.
The first thing you need to know is the wattage rating of your power supply. It tells you the maximum amount of energy it can output to light up your LED strips.
In addition to wattage, it is also essential to check the voltage and current ratings of your power supply. The latter will determine whether or not your LED strip lights can be compatible with it.
Generally, you will find that most of the power supplies out there use 12 volts and 2 amps for their electric current output. This means that they are fully compatible with most of the LED strip models out there.
Channels:

Channels are a simple way to connect LED Strip Lights. They are available in a variety of styles and lengths, and can be easily cut to fit your project.
Also, They have a body made of anodized aluminum, and a light diffuser that is made of PC or PMMA. They can be mounted on flat surfaces or recessed into a wall.
The light diffuser is designed to spread the light from the LEDs more evenly. It also helps to dissipate heat from the strips.
If you have a corner, a channel with a diffuser can help keep the lights bright in that spot. Without one, the lights may get too dim in the area.
Most strip LEDs are sold in a single color, such as white, red, green, and blue (RGB). They have three diodes per strip that are wired to their own channels. The color is controlled by the power that’s delivered to each LED.


Add comment