
Table of Contents
How Do I Connect To AWS Rpi?
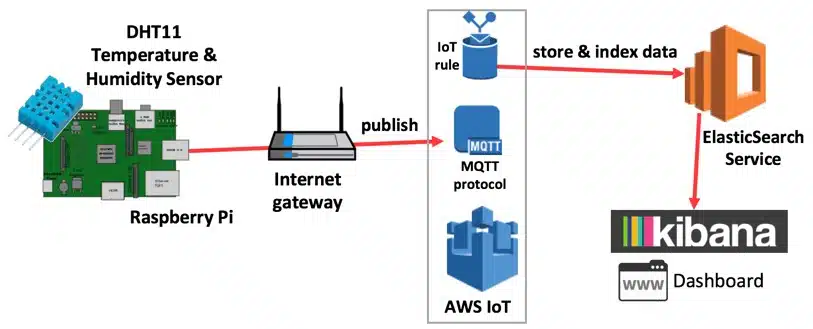
How Do I Connect To Aws Rpi? The Internet of Things (IoT) is a network of interrelated devices and sensors that transmit data over the Internet. This data is collected and analyzed by cloud systems for use in applications.
Log into the AWS console and select the “Things” menu item. From here, select the Create a New Thing option. Enter a name for the device and select the auto-generate new certificate option.
Connecting To Aws Rpi:
The Internet of Things (IoT) is a system of interrelated computing, digital, and mechanical devices that transfer data via the Internet with unique identifiers. This information can be used for various applications. The Raspberry Pi is a popular choice for IoT projects. It has a range of GPIO pins that can be controlled from the cloud using AWS IoT Greengrass Core software.
AWS IoT is a powerful platform for building IoT solutions, but it can be difficult to manage a fleet of Raspberry Pi devices. JFrog Connect is an easy-to-use, scalable solution that can help you get your IoT devices up and running in no time. It can also help you maintain a stable and secure device fleet.
First, you need to set up AWS-CLI on the Raspberry Pi. This will give you the access key ID, secret access key, and AWS region name that you need to connect to AWS IoT Core from the command line. You will also need to create a thing on AWS IoT Core.
The thing created on AWS IoT Core will send the data to the DynamoDB database. This data is sent in JSON format and contains the mac ID, random number, and a timestamp of the data. Once the data is received, the AWS IoT Core will update a table on the DynamoDB called items.
Setting Up Aws Rpi:
Using AWS-CLI on Raspberry Pi is a great way to manage and control your AWS infrastructure. This tool offers a consistent interface that can be used to manage a number of different services like Amazon S3 and EC2 compute instances. You can also use this tool to create and manage Amazon Lambda functions. However, if you plan to use AWS-CLI on Raspberry Pi, it is important to ensure that your AWS credentials are configured correctly. This includes the Access Key ID and Secret Access Key as well as the AWS region name. You can check the status of your AWS-CLI configuration by executing the AWS IoT list-things command.
The Internet of Things (IoT) is a system of interrelated computing, digital, and mechanical devices that transfer data over the Internet with unique identifiers. This data can then be accessed from the cloud, which allows developers to build new applications. AWS IoT Core is one such service that supports the Raspberry Pi Pico W board, which uses the RP2040 microcontroller and a CYW43439 chip for 2.4 GHz WiFi communications.
First, you need to set up the Pico W as a “thing” on AWS IoT Core. Click the All Devices menu item on the left-hand side of the screen, followed by the Things menu item. From here, click the Create Things button to create a new thing that will represent your Pico W board. Enter a thing name, and select the option to auto-generate a new certificate. You can then choose a policy that will authorize your device to connect to AWS IoT Core.
Configuring Aws Rpi:
The Raspberry Pi Pico W board is a powerful microcontroller that can be used for Internet of Things (IoT) projects. It has a dual-core Arm Cortex-M0+ processor, and the Pico W also comes with an Infineon CYW43439 chip that is used for 2.4 GHz Wi-Fi communications. Using this combination, you can build an IoT device that will connect to AWS IoT Core via MQTT. This will allow the device to send and receive messages from AWS IoT Core and control GPIO pins on the Pico W.
To connect the Pico W to AWS IoT Core, first, log into the AWS Console and create an account if needed. Next, log into the IoT tab and click MQTT test client. Enter picow/button in the MQTT topic filter and then click the Subscribe button. This will enable the Pico W to connect to AWS IoT Core and publish and subscribe to topics.
You can also set up a site-to-site VPN with your home router to allow the device to use AWS IoT Core. However, this will require advanced networking knowledge and may be difficult to implement. Alternatively, you can install an SD-WAN solution such as Riverbed SteelConnect on your Raspberry Pi.
While it is possible to use AWS IoT to connect devices to the cloud, JFrog Connect makes this process easier and faster. It supports a wide range of Raspberry Pi devices and can handle fleet management for thousands of devices. It is also easy to manage maintenance for this kind of device fleet with JFrog Connect.
Using Aws Rpi:
In this tutorial, you’ll learn how to use the AWS IoT Core message broker feature to sync the state between your Pico W board running MicroPython and the cloud. You’ll also enable the ability to control GPIO pins from the cloud using Python code. This is a great way to build projects that combine the power of IoT with your existing hardware.
Start by creating an AWS IoT thing to represent your Pico W board in AWS IoT Core. Select the Create Things menu item, enter a thing name, for example, “picow,” and click next. Then select the option to auto-generate a certificate for this thing. You’ll also need to set a policy for this device. The default policy is simple and allows the device to subscribe to topics such as “picow/button.” When your device publishes messages to a topic, your application can receive them via the AWS IoT Greengrass messaging service.
Once you’ve created a thing, you can connect to it from a terminal on your Raspberry Pi. To do this, you’ll need to know the IP address of your device. This can be done by scanning your network for devices or logging into your router’s management UI. It’s important to note that not all home routers have site-to-site VPN capabilities, which are required for this type of configuration.


Add comment