
Table of Contents
How Do I Connect Raspberry Pi To Microsoft Remote Desktop?
How Do I Connect Raspberry Pi To Microsoft Remote Desktop? Raspberry Pi is an amazing little computer that can be used for a variety of purposes. From checking emails to managing a PowerShell command line, there are endless possibilities.
One such use is to remotely access the Raspberry Pi from a Windows computer. This can be done by using Microsoft Remote Desktop.
1. Download and Install RDP Client:
The Raspberry Pi is a low-cost, credit-card-sized system that can either be connected to a computer or used as its own standalone computer. It is capable of running various operating systems such as Linux, and can be used to explore computing and learn programming. It is also capable of connecting to a monitor, keyboard, and mouse. However, it does not come with a built-in remote desktop connection.
Microsoft’s RDP is a network protocol that allows users to remotely access and interact with a computer’s graphical user interface. It operates over network port 3389 and sends data such as mouse movements, keyboard input, and the desktop display across a secure encrypted connection. This enables users to work from home or on the road and is often used by IT support technicians who need to troubleshoot problems with client computers.
While there are a variety of different remote desktop clients available, Microsoft’s Remote Desktop is one of the most popular. It is available for macOS and iOS, as well as Windows. It requires both the local and remote machines to have RDP enabled and can be configured to use a specific network folder or an existing RDP session.
The xrdp server is a free, open-source program that provides a simple way to connect to your Raspberry Pi from a PC or Mac running the Microsoft Remote Desktop client. It can be run in either IoT Master or IoT Slave mode.
2. Setup XRDP Server:
The Raspberry Pi is a small credit card-sized computer that can be used as a desktop computer if you use Microsoft Remote Desktop. This is the same protocol that is used by Windows computers and it can be accessed from any Windows, Linux, or Mac computer. It is one of the best and safest ways to connect to your Raspberry Pi remotely.
In this Bible, I will show you how to set up XRDP on your Raspberry Pi so that it can be accessed using Windows Remote Desktop. This is a very simple process and requires no complicated configurations or commands. It is also very fast compared to VNC and Teamviewer.
Before we begin you will need to know your Raspberry Pi’s IP address which can be found by executing the command ifconfig. You will also need to have a graphical environment installed on your Raspberry Pi because the XRDP software works with a graphical desktop. If you are only looking for terminal sharing then you can skip this step.
For this tutorial, I am using Pixel which is a graphical desktop environment available in the Raspbian repositories. However, this method will work on any distribution that provides a GUI. Once you have the graphical environment installed you will need to install the XRDP server which is a piece of software that allows your Raspberry Pi to accept RDP connections.
3. Create a User Account:
Remote Desktop is a protocol developed by Microsoft that allows a user to access a computer from a remote device. In order to use the remote desktop feature, you must have a computer or laptop with Windows on it and an active internet connection. Depending on your device, you may also need to install additional software.
Once you have the necessary software installed, the next step is to create a user account. To do this, open Terminal and type the following command:
Upon completing this command, you will be asked to create a username and password for the new account. Enter the details as shown, then click “OK”. If you want to give this account sudo privileges (which will allow it to execute commands such as apt-get and install), then add it to the Sudo group too.
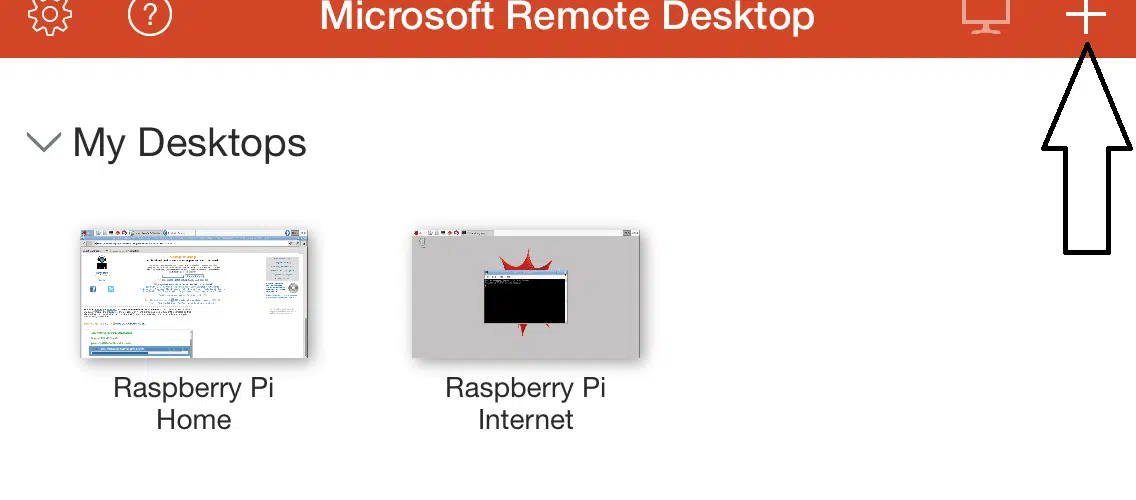
Once you have created the user account, close the Terminal window. Now you can connect to the Raspberry Pi using the Microsoft Remote Desktop app. To do this, open the app and click on the + button. In the Add PC menu. Select the option to add a remote computer and enter the IP address of the Raspberry. Pi in the PC name field. You can also check the Redirect Folders box to choose. A local folder that you will be able to access from the remote session.
4. Connect:
The classic Microsoft Remote Desktop application is still widely used by Windows. Users as it comes pre-installed with the operating system. Once you open it simply enter the Raspberry Pi’s local IP address in the Computer field and click on Connect. You can then interact with your remote Raspberry Pi device using its keyboard and mouse. You can save your remote connection settings which include the display resolution. Multi-monitor support, and more, and close your session at any time.
For Mac and Linux, the process is slightly different but still straightforward. You can use an app like TeamViewer which supports X11 forwarding over SSH. This allows you to launch any application on the Raspberry Pi remotely. It’s a great option if you want to run a desktop. GUI with the Raspberry Pi without having it connected to a monitor or TV.
Another good option is CoRD which is a free open source solution that works with the Raspberry Pi and most major Linux distributions. It’s not as polished as the official Microsoft product but it does the job just fine. It also works with X11 forwarding over SSH which makes it more compatible with the Raspberry Pi than many other software solutions. Finally, if you’re an Apple user you can download the new Remote Desktop app from the App Store.


Add comment