
Table of Contents
How Do I Get My Mac to Recognize My Printer?
If your printer isn’t recognized by your Mac, you’re not alone. It’s a common problem and can be quite frustrating, but don’t give up.
There are several solutions to this problem, from troubleshooting to installing or adding wirelessly.
Troubleshooting How do I get my Mac to recognize my Printer:
If you are unable to see your printer on your Mac, there are a few things you can try. First, make sure your printer is physically connected to your Mac.
If it is not, try connecting it via a different port. If it does not show up after connecting it, you may need to install new software. In addition, make sure you have installed the latest updates for your Mac operating system.
If your printer is connected via AppleTalk, it may have communication issues. This will prevent you from accessing file-sharing options and may prevent you from being able to browse the Internet.
If you are using a shared printer, make sure that it is set up for the same network. Also, make sure that sharing is turned on if the printer is shared with other devices.
Installing How do I get my Mac to recognize my Printer:
Installing a printer on a Mac is fairly simple, but the printer must be in working condition before you can continue.
There are a few ways to do this, including using a USB cable, IP address, WPS button, and Bluetooth. Just make sure to follow the steps correctly and your printer should be up and running in no time!
First, connect the printer’s USB cable to your Mac. Once the printer is connected, the Mac should automatically detect it. If it doesn’t, you can manually add it by entering its IP address. You can find this address in your printer’s user guide.
Adding:
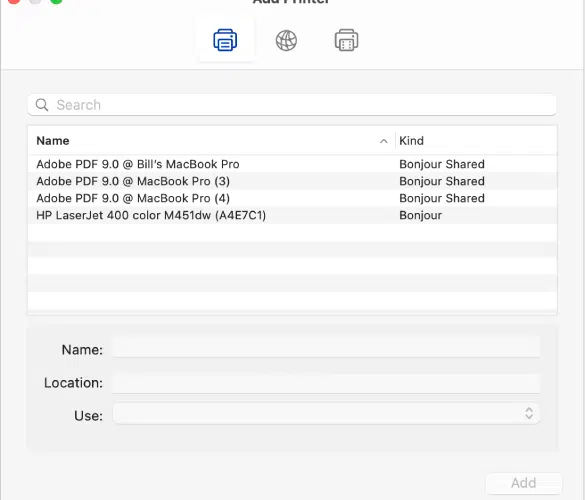
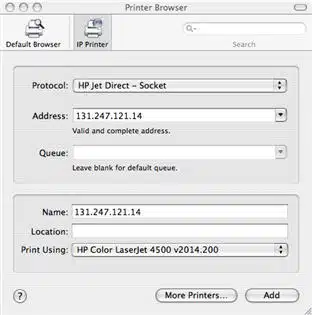
Also, There are several steps to adding a printer to your Mac. First, you need to find your printer’s IP address. This can be found in the network settings for your printer.
Once you have this number, you can enter it into the Add Printer window. Then, you can configure your printer’s settings.
After you have entered the IP address of the printer, you will need to add the name of the printer, the location, and any software.
Once you’ve entered all of the information, click the “Add” button. Once the printer is added successfully, you can tweak the printer’s settings and choose a default paper size and printer driver.
Adding wirelessly:
If you’ve been looking for a way to connect your printer wirelessly to your computer, then you’ve come to the right place. Epson printers are equipped with wireless networking capabilities.
Follow the instructions in the printer’s manual or application to set up this feature. This feature allows you to connect up to five devices simultaneously to your printer.
The first step is to install the printer drivers on all of the computers in the network. The installation process is usually automatic for Windows 10.
However, if the printer you want to add not automatically detects by Windows 10, you may need to follow the steps outlined in the operating system’s wizard.
Checking for error messages:
Also, If your printer isn’t recognized by your Mac, you may have some connection issues. If this is the case, you can try removing the printer and adding it again.
To remove the printer, click the “-” button next to the printer in the list. To re-add the printer, power off your Mac and connect it to the printer again.
You should first check your printer’s settings. This usually happens in System Preferences. To find these settings, select the Apple icon in the upper-left corner of the screen and select Printers.
A menu will appear with options, including your supplies. If you can’t see these options, you might need to contact Apple support.
Clearing print queue:
If you’ve run into this problem, there are a few simple things you can try to clear the print queue and get your Mac to recognize your printer again.
First, check to see whether you’re printing to the wrong printer. If so, select the printer from the Printer pop-up menu and press resume to get the printing process back on track.
Next, check to see if your printer connects to the network. If so, it should be listed in System Information. If not, consult the printer’s documentation for specific troubleshooting steps.
Also, If you’re using a Mac, you can open the printer queue window by clicking the printer icon in the Dock. Then click on the Resume button to continue printing.


Add comment