
Table of Contents
How To Connect 1 Printer To 2 Computers With USB?
How To Connect 1 Printer To 2 Computers With USB? Many printers are available with USB connections. For this reason, they are widely used in offices and homes.
Rather than switching the USB cable from one computer to another every time, you can use a peripheral switch or homegroup to enable two computers to share the same printer. The process is relatively simple and straightforward.
1. Install the Driver:
Typically, a USB printer will be recognized automatically by the operating system. But if it isn’t, you will need to install the driver, which is a piece of software that coordinates an operating system with a hardware device. This can be done by installing the CD that came with the printer or downloaded from the manufacturer’s website based on the model number.
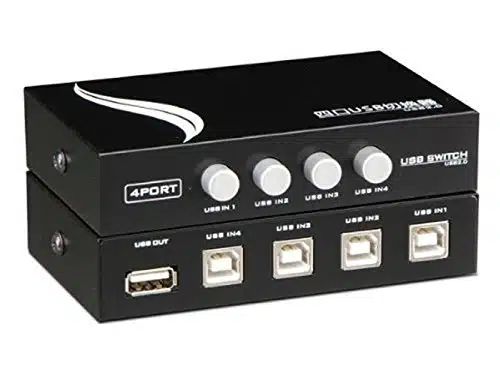
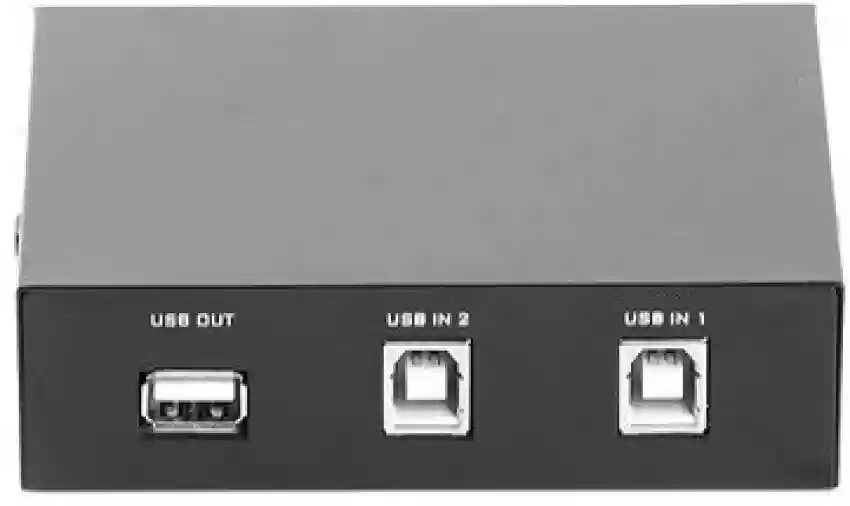
Once the driver is installed, you can connect it to the computer you want to use it on. To do this, shut down both computers and the printer, then connect the square end of a USB cable to the USB port on the switch, and the thin rectangular end to your printer. Connect the power adapter to the switch and to a standard wall outlet.
You should see your new printer listed in Printers & Scanners. Select it and click Properties. On the Sharing tab, choose to share the printer. You can also choose a name for the printer, which will be what other PCs will use when connecting to it.
It’s important to note that the printer must be connected to the first computer in order for other PCs to be able to use it. However, if you don’t have access to the original PC, there is another option: printer sharing over a network.
2. Connect the Printer:
If the printer supports network connection via ethernet cable (as most modern ones do) or WiFi, you can connect it to a network switch and share it among several computers. This is the preferred method as it provides a more stable connection than USB, which depends on a single computer to be always connected. If you don’t have a network switch, you can still connect two PCs to the printer by using a USB printer server or setting up a workgroup in Windows.
The process is simple: shut down both computers, disconnect the printer from the power source, and plug a USB cable into each computer. Then, connect the other end of each cable to the input jacks on the back of the USB hub. Make sure the USB ports on each computer are empty before connecting them to the USB hub. Once the printer is connected to the USB hub, you can turn on the computer and open the Settings app.
Select “Devices” and then “Printers & scanners.” If Windows detects the device, it should appear in the list of available devices. If it doesn’t, click.
Add a printer or scanner. After a short wait, the device should appear in the list. Select it and then follow the on-screen instructions to finish the connection.
If you are having trouble connecting your wireless printer, try changing the USB cable or reinstalling the driver. You can also contact the printer manufacturer for support.
3. Connect the Computers:
Printer sharing has become more popular than ever in recent To years, especially with the growing number of homes and businesses with multiple computers. It allows you to print documents, photos, and other files from one computer to another without having to purchase or maintain an additional printer for each computer in your network.
There are a few different ways that you can connect your computers to the same printer. One way is to use a USB switch that has a dedicated printer port for this purpose. Another way is to use a wireless connection, which is becoming increasingly common. Finally, you can also connect the printer directly to each computer with a USB cable.
If you are using a wireless connection. Simply make sure that both the printer and the computers are on and connected to the same Wi-Fi network. Then, open the ‘Add a Printer or Scanner’ option in the Windows. Menu (or press the ‘Windows’ key on your keyboard) and select the name of the printer. The printer must be physically within range of the router for this to work. But if you keep the printer and computers close enough it should work well.
If you are using a wireless connection. Your computer may have downloaded the necessary drivers for the printer automatically, which can save time and effort. This is particularly true if you are using a newer version of Windows. These operating systems generally have up-to-date drivers pre-installed. If not, you can find them online and install them manually.
4. Test the Connection:
Printers are an important piece of hardware in any home or office. However many of them aren’t compatible with network connections that allow for easy printing across multiple computers. This is especially true for USB printers, which only work with one computer at a time.
Fortunately, there are ways to connect a single USB printer to two PCs without the need for a network. This can be done with a simple USB switch that is capable of sharing a printer, or by using a more advanced software solution. Both methods can be used to share a printer over a short distance, but they are more limited than solutions that use an ethernet cable or WiFi.
Before you start, make sure that the printer and both computers have the latest driver installed. You can also check the printer’s documentation for additional help. Also, make sure that both computers are connected to the same network. This can be done by opening the Control Panel and selecting Network Connections. Then right-click on the cable connection (Local Area Connection 2 in our example) and choose Properties.
If you are using a USB switch that is capable of sharing a Printer. Then follow the steps in this article to configure it. For the best results, use a high-speed USB 2.0 hub, available at most computer stores and electronics stores.


Add comment