
Table of Contents
How to Connect an HP Deskjet Printer to WiFi:
If you have an HP printer and you want to use WiFi to connect to the Internet, you need to make sure that you have a compatible device and a WiFi connection.
You’ll need the USB cable to connect the printer to your computer, and the software for your printer. You can find the software by looking in the Start menu for a tile named for your printer.
It may also be available in the Applications menu, or you can open the Welcome Back screen from the CD you purchased with your printer.
Wireless printing requires both a printer and a compatible device:
You can print from any compatible device via a wireless network if both of them have wireless capabilities. The most convenient way to do this is through the WPS (Wide-Fi Protected Setup) feature.
You simply press the WPS button on the printer and the corresponding WPS button on your wireless router to pair the two devices.
This will automatically send data from the printer to the printer’s memory and install the necessary printer drivers for your PC.
To enable wireless printing, make sure your computer or mobile device is Wi-Fi Direct-enabled. If your printer does not support Wi-Fi Direct, check the printer’s manual or check the user guide.
Wi-Fi Direct-enabled devices will appear in the list of available wireless networks. In addition, you’ll need an HP printer plug-in application on your mobile device.
Once you’ve installed the necessary software, you should be able to print. However, if you don’t receive any printouts, the problem may lie with your wireless network or router. Then, you can power cycle your device to try to fix the problem.
If that doesn’t work, try running HP’s special troubleshooting software for Windows. This software can identify wireless problems and help you troubleshoot the printer’s configuration.
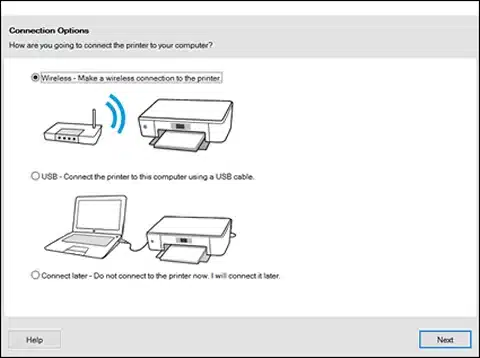
The manual connection between printer and PC:
You may need to manually connect your HP Deskjet printer to your PC if it isn’t connected to the network. You can find the printer’s wireless connection settings on the control panel.
Make sure the printer is turned on and in the “Wireless Connect” mode. If it is, you’ll notice the Wireless icon blinking rapidly and signal bars blinking in sync with the Wireless light.
Connecting your HP Deskjet printer to your PC is simple. First, you need to make sure that your computer supports Wi-Fi Direct.
If it does, you can follow the instructions on the Wi-Fi Direct page to connect your printer. If the printer asks for a password, you must enter it before you can print.
After you have registered your printer with HP, you must sign up for HP Instant Ink. This will allow you to receive free ink refills without replacing the printer. Next, connect your printer to your computer using the USB cable.
Channel that your network uses How to connect an HP Deskjet printer to WiFi:
In most cases, you can change the Channel that your network uses to connect an HP Deskjet printer to WiFi on your network by changing its settings.
To do this, go to the control panel on your printer and choose the option “Network Configuration Page.” You’ll see a list of nearby networks and their channels.
Choosing the correct Channel for your network is essential for your printer to be connected to your network. Using the wrong channel can cause the printer to lose connection. If this is the case, try rebooting the printer with a voice assistant.

The latest driver and software updates can solve these issues. If these do not help, you can also try hardwiring the printer to the router. Although this may not solve all problems, it will guarantee a more stable connection.
Another option is to set the printer to a static channel. By default, an HP Deskjet printer cannot connect to a wireless network. It listens on a different channel than the rest of your devices. You can also connect your HP Deskjet printer to WiFi via the computer.
Restarting the printer How to connect an HP Deskjet printer to WiFi:
If your HP printer has stopped working, it may be necessary to reset it to its factory settings. You can do this by following a few simple steps.
First, turn off the printer, then wait for about 5 seconds while the device warms up. If your HP printer has a wireless connection, the printer should reconnect to the network automatically.
Next, you should check the ink level of the printer. Some HP printers will keep track of the last five ink cartridges that you’ve used, so you must make sure that each one is completely full.
In the older models, you can manually check the cartridge levels by rotating them or removing the motherboard battery. However, the same trick won’t work on newer models.
If none of these steps work, you can try the factory reset method. This technique can help fix most common printer problems. While the process may seem complicated, it’s actually very simple.
To do this, you’ll need the power cord and the reset button. Press and hold the power and cancel buttons for ten seconds. After 10 seconds, release the buttons. Then, the printer will attempt to print a test page.


Add comment