
Table of Contents
How To Connect Crochet Pieces?
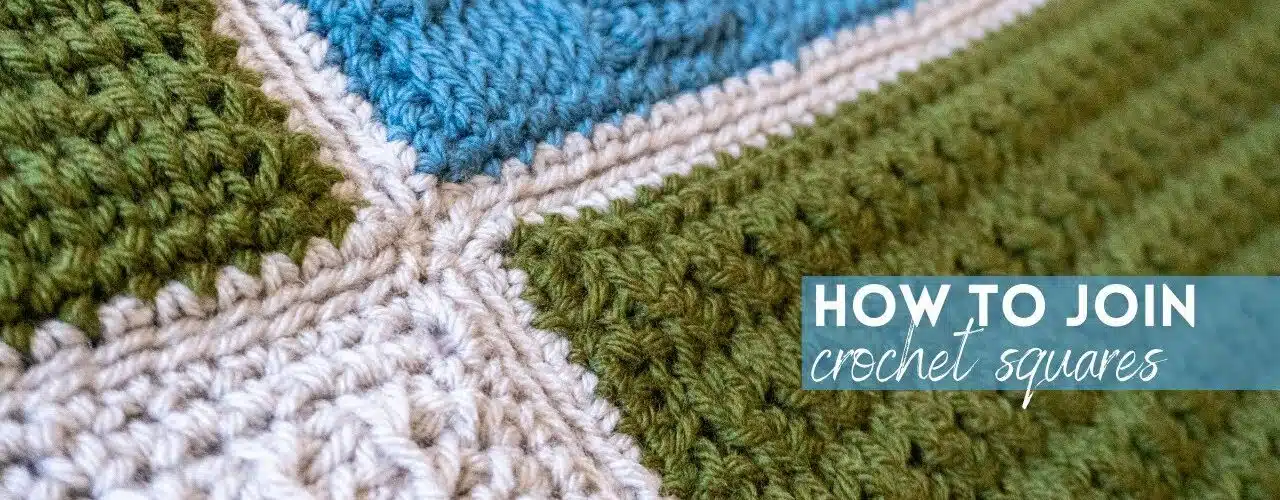
How To Connect Crochet Pieces? Large crochet patchwork blankets can be very time-consuming and the sewing up of all those tiny squares can be tricky. But they don’t have to be with this super simple no-sew method for joining crochet motifs!
There are 4 different methods of seaming crochet together. We will cover the whip stitch seam, mattress stitch seam, slip stitch seam, and the join-as-you-go (JAYG) method.
Features Of Connect Crochet Pieces
- Aside from the obvious color and texture, the size of each stitch makes a difference to the overall look and feel of your crochet project. It can even change how a piece fits on the body (think: tighter is better). In crochet, achieving the right size is called a ‘gauge.’ And while most patterns come with a recommended hook size, it’s a good idea to make a gauge swatch before you invest all that yarn and time into your project.
- One way to connect flat crochet pieces is by using a surface slip stitch. It creates a flat, decorative seam and works well for joining squares or any other motif that you want to lie flat.
- Another technique is to join motifs by overlapping the front and back loops of each stitch. This technique is great for connecting two motifs and creating a more 3-dimensional seam, especially when using a contrasting color.
- Lastly, you can also join crocheted pieces together by sewing through the tops of the stitches. This method is great for joining 3-dimensional shapes such as ears, arms, or legs and allows you to reduce the amount of sewing that needs to be done at the end of your project.
- Using the varying heights of basic crochet stitches can also be a fun way to add detail or make a specific shape in your project. Try using taller stitches to create a thick line, shorter stitches to create a thinner line, or combining different stitch heights to make a wavy line. You can even use this technique to create a pattern on your project by adding bobbles, popcorns, puffs, eyelets, or cables.
Single Crochet Seam
When working on amigurumi or other tubular projects that require joining pieces of crochet, it’s best to use a flat seam. This type of seam allows for a smooth and sturdy finish, which is ideal for joining crochet squares and other shapes to create hats, scarves, and even clothing. This crochet seaming technique is a great alternative to using a slip stitch join, and it’s simple enough for beginner crocheters to use!
To work this flat single crochet seam. First line up the edges of your two pieces that need to be seamed. Use locking stitch markers or scrap pieces of yarn to help you keep the pieces aligned. Next, insert your hook from the front to the back of the stitch on one piece that’s closest to you, and into the matching stitch in the other piece. Yarn over and pull through both stitches to create the first stitch of your seam. Repeat the process of inserting your hook from front to back and then from right to left until you’ve gone all the way around the edge of both pieces of crochet.
To work a neat and clean seam, it’s recommended that you use the same yarn for your seam as was used in the piece you are joining together. It’s also helpful to block your finished project, if it is not already blocked, as this will improve the drape and stitch definition of your project.
Double Crochet Seam
Using the mattress stitch-to-seam crochet can create a seamless and invisible seam. It’s a very strong technique that’s perfect for seaming the edges of crochet collars, and hats. Or any other project where a neat finish is required. It can also be used to seam crochet squares or other pieces worked in rows. Such as the final round of a crochet blanket.
This is one of the most straightforward and effective ways to join crochet pieces together. Particularly when you’re working in rows. It’s important to be sure that your pieces are flat before you start seaming them together though. As some stitches tend to curl. Make sure you use a blunt-tipped tapestry needle. So that it doesn’t slip through the loops you’re trying to work into.
Thread your tapestry needle and hold the two pieces of crochet. That you’re joining together side by side with their right sides facing each other. Insert the needle into a back loop on the first piece of crochet. And then through the second back loop on the second piece.
Repeat this for every stitch along the edge of the crochet piece until. You reach the end and have joined the two pieces together. Pull the yarn tight as you go to tighten up the seam and then fasten off and weave in the ends.
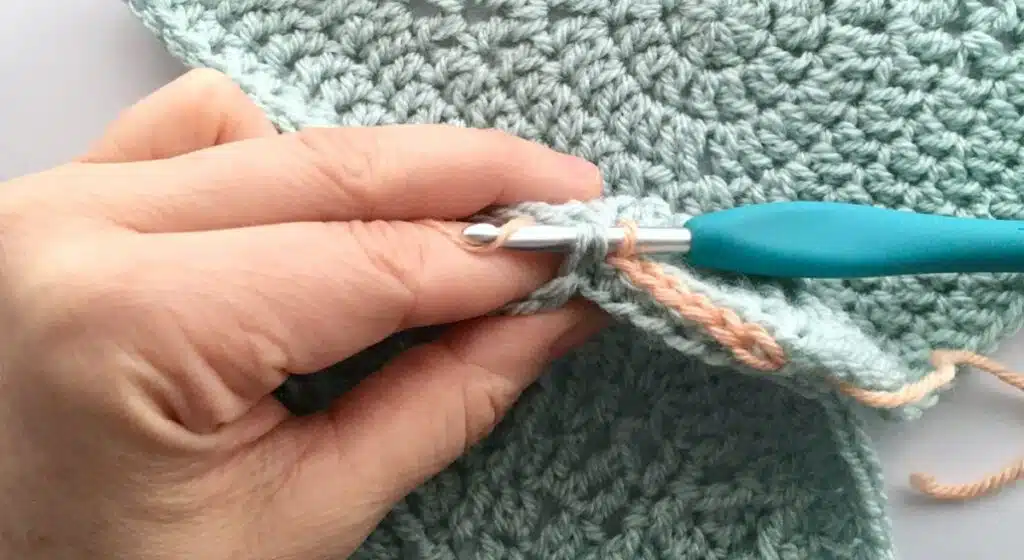
Whip Stitch Seam
Some crochet projects call for seaming stitches as you work or after the motifs have been completed. This is often done for tubular-type projects such as hats, sleeves, or blankets. The technique used is a variation of the simple whip stitch. And it’s one of the fastest ways to create a flat, stable seam.
To begin, thread a yarn needle (also known as a tapestry needle. Or darning needle) with a length of yarn that matches the color of the pieces you’ll be joining. It’s best to use a long needle with a blunt. The tip can easily slip through the top loops of each stitch.
Line up the two edges you’ll be sewing together, right sides facing each other. Insert the needle under both of the top loops. On each piece’s edge starting from the same end as the yarn tail. Make a small, evenly spaced stitch and pull tight to secure the join.
Repeat the process on the other side of the seam. When you’re finished, check your work and weave in any loose ends. It’s recommended that you leave a long tail when you finish the piece you’ll be using for seaming. So that you have enough yarn to complete the seam. You may not need all of your original tail if you’re only working. A short distance across your project, but you can always cut another length of yarn if needed.
Slip Stitch Seam
Some crochet pieces, like the edges of a garment. Worked in rows or the bottom of a crochet hat made from rectangles. Needs to be sewn together at the end. Many crochet projects, however, are worked seamlessly in rounds and don’t require any sewing. Or connecting afterward, including infinity scarves, hats, afghans, and amigurumi toys. When a project requires seaming, there are several different ways to do so, with each having its advantages and disadvantages.
One of the most popular methods for joining pieces is to slip stitch. A technique that creates an invisible seam on the right side of your work. To start, thread your needle or tapestry needle (also called a darning needle) double. And tie a knot at the end of the yarn.
Next, fold your Piece of work to match the length of your desired hem or seam. Insert your needle into the fold at a point where you want to begin, for example, 2. And then bring it out a short distance away, for example, 3.
Repeat steps 2 and 3 around the edge of your work until you’ve finished seaming. At this point, you can snip the tail of your yarn so it’s a little shorter. Then your last stitch to make the endless noticeable. If you’d like to, you can also block your seam to help give it a nice, even look.
Conclusion
Many crochet projects require seaming. Crochet garments worked seamlessly in rounds, hats made from rectangles, and amigurumi toys all relied on good seaming techniques.


Add comment