

Table of Contents
How To Connect Flex Duct Together?
How To Connect Flex Duct Together? A flex-duct system can work fine if it’s properly designed. That means performing a Manual J load calculation, a Manual D for duct design, and a Manual T to determine the register and grille sizes.
It’s important to support duct runs adequately, to avoid sags and kinks that reduce airflow. This is especially true for long duct runs.
Features Of Connect Flex Duct Together
- A well-planned airflow distribution system is essential to maintaining a consistent indoor comfort level, balancing humidity levels, and providing optimum performance for your heating and cooling systems. This is where flex ducts come in — they offer a more flexible alternative to standard metal ductwork, maneuvering through every awkward angle, nook, and corner that may impede normal airflow.
- Flex ducts are also known for their quiet operation because they are less prone to vibrations and whistling. They’re made of a combination of materials, including fiberglass lining to help with thermal insulation. But even the most durable ducts can fail to perform if not installed properly.
- One of the biggest mistakes is to insufficiently stretch a flex duct, which leads to longitudinal compression. This dramatically increases the friction rate, slowing the flow of air.
- The good news is that you can avoid this problem by making sure to follow a few best practices. The following straightforward guide offers a practical and no-nonsense way to make this crucial connection. Start by carefully unrolling a section of flex duct on a flat surface, then trim the end with a utility knife if needed to ensure it’s the correct length. Once you have a clean cut, begin stretching the duct to its full extension. Taking the time to do this prevents the flex from becoming compressed during installation and significantly reduces air leakage. Next, attach the connector to the flex duct using foil-backed tape or metal clamps. Finally, seal the duct-collar junction with mastic. After the connections are sealed, briefly turn on your HVAC system and perform a tactile inspection to make sure there are no gaps or loose fittings that can cause air leakage.
Attaching the Duct Connector
The same flexibility that makes flex ductwork convenient and efficient also presents a unique set of challenges when installing. Unlike rigid metal ductwork, flex ducts can be compressed to fit through tight spaces, but this compressibility can lead to excessive friction that reduces airflow efficiency and raises energy bills.
The best way to combat this is to be meticulous with measurements. When you cut a piece of flex duct, always double-check it to ensure that you’ve made it exactly the right length. This attention to detail will ensure that the duct isn’t stretched or compressed, which would create unnecessary friction and decrease airflow efficiency.
Additionally, you should never splice two pieces of flex duct together without using a duct connector. A duct connector is an essential component that joins equipment and ductwork to isolate vibrations. And noise from the rest of the system. It consists of fabric material and sheet metal securely fastened. On both sides to effectively isolate noises from fan and blower vibrations.
Lastly, sagging ductwork is another common issue that can hinder airflow efficiency. You can avoid this by keeping ducts as close to the ceiling as possible and ensuring they’re supported by appropriate supports and straps. You should also inspect ductwork regularly for damage and wear. By following these tips, you can enjoy maximum efficiency and comfort in your home or business.
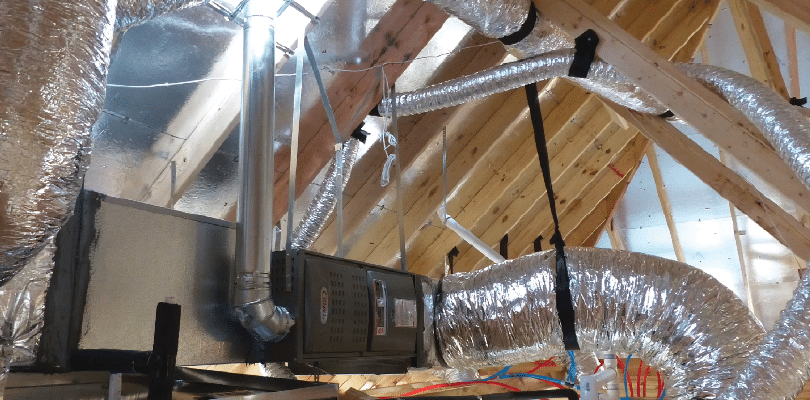
Inserting the Flex Duct into the Rigid Duct
As the backbone of an HVAC system. Rigid ducts need to be tightly fitted and well-supported to avoid energy losses, condensation problems, and airflow restrictions. This is especially important in a vented attic or crawl space where sagging. Compression can degrade the performance of the duct system.
While rigid ducts are the workhorses of an HVAC system, flexible ducts can save contractors time and money on certain projects. They are a great choice for tight spaces, but they must be properly installed and connected to the rigid ducts. The good news is that connecting flex to rigid is easier than it may seem.
Using the right materials will ensure that the connection between flex and rigid is airtight. For example, the ducts should be pre-insulated with fiberglass blanket insulation covered by a foil or plastic vapor barrier. In addition, they should meet code or program minimum R-value requirements.
The splice should be made at the end of the duct where it attaches to the sheet metal collar. For this, contractors should follow the recommended methods listed in UL 181B Standard “Closure Systems for Use with Flexible Ducts and Air Connectors.”
Joe Smith of Coastline Supply, Myrtle Beach, SC, demonstrates to technicians how to make a mechanical seal at the splice. The procedure involves folding the outer jacket and fiberglass insulation over the inner core and fastening it with a nylon draw band pulled taut with a tensioning tool. Then the splice should be sealed with mastic.
Connecting the Flex Duct to the Plenum
A few years ago, Neil Comparetto of The Comfort Squad in Virginia shared his secrets for getting flex ducts to perform like sheet metal. He explains that it’s all about doing the proper work up front and designing the system correctly.
First and foremost, he points out that you can’t use a flex duct until you’ve done a Manual J load calculation, a Manual D for duct design, and a Manual T to calculate register and grille sizes. If you skip all this legwork and jump straight into an attic with a bundle of flex, you’ll be in for some bad surprises.
Next, it’s important to properly splice the flex duct to the rigid duct using either foil-backed tape or metal clamps. Wrap the tape carefully around the connection multiple times to ensure that it is tight and secure. This meticulous approach eliminates air leakage and makes the joint a fortress against the demands of an HVAC system.
Finally, he notes that it’s essential to support the ducts at plenums and distribution connections. If you don’t, the duct will sag and kink over time, dramatically reducing its ability to deliver conditioned air. For the best results, he recommends that you allow for 1 inch of sag in every 4 feet of duct length. The sag can be supported with narrow materials such as plumbing straps or wire, but avoid crushing the inner liner.
Closing the Connection
When flex ducts are properly installed, they make a great ventilation solution for homes with nontraditional layouts. However, if contractors are too eager to get their job done and don’t take the time to do it right, the result can be poor-quality ventilation results. That’s why the Air Diffusion Council (ADC, formerly known as the American Duct Manufacturers Association) has published easy-to-understand installation guidelines for contractors.
The ADC’s guide covers everything from selecting the correct size duct connector to sealing the connection between a flex duct and rigid duct with tape or mastic. The guide also covers important details, like ensuring that the flex duct doesn’t have sharp bends that restrict airflow.
A proper flex-to-rigid connection is an essential step in preventing air leakages that waste energy and money. But, as any experienced HVAC contractor knows, creating a tight seal can be tricky. A good way to ensure a solid connection is to carefully inspect the joint with your HVAC system running briefly. Run your fingers around the joints, feeling for any drafts that indicate an air leak.
Another important tip is to avoid sagging or compressing flex ducts. This can reduce the flow of air and create friction in the ducts. In fact, according to Energy Vanguard. Compressed ducts can have up to four times as much friction as fully extended ducts! To prevent sagging, it’s recommended to install supports every 4 feet.
Conclusion
Flexible duct connecting plays an essential role in the distribution and optimization of airflow in HVAC systems. While it has many advantages over rigid ductwork, like easy installation and adaptability, it is also a source of problems when not installed correctly. In this article, we’ll explore the fundamentals of flex duct design and installation, providing helpful insights to HVAC professionals, and anyone else interested in optimizing airflow distribution.


Add comment