
How to Connect Printer to Network Windows 7:
In Windows 7, the easiest way to add a printer to the network is to use the ‘Add a device’ feature. Click the Start button at the bottom-left corner of the screen and select ‘Devices and Printers’. Read more to get information on How to Connect Printer To Network Windows 7?
In the ‘Add a device’ window, click ‘Network‘ and enter the IP address of the printer you want to share. Next, click ‘Connect’ to begin the process.
To connect a printer to the network, go to the Control Panel, and open Network and Sharing Center. Click the ‘Connect Printer to a Network’ button, then select ‘Add a printer’. Type the IP address of the printer in the field provided.
If your printer doesn’t have a default IP address, look for it under ‘Network’. Once you’ve found the printer, click ‘Connect’ to connect to the network.
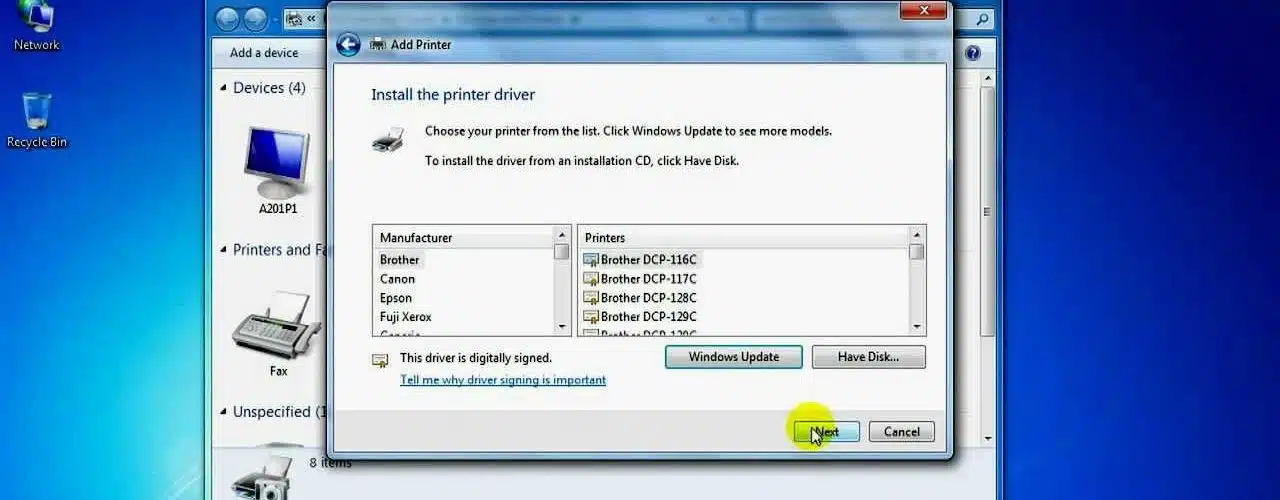
Once you have your printer connected, open Control Panel. On the printer that you want to share, click ‘HomeGroup’. Now click ‘Install printer’. This will install the driver for the printer.
If the printer is not already installed, you’ll need to install it manually. Once the driver is installed, the printer is ready to share. Once you’ve done this, you’ll be able to print from all of your computers.
To add a printer to the network, you must first uninstall it from your computer. You’ll need to do this before you reinstall it.
Instructions to Connect Printer to Network Windows 7?
Then, navigate to the top menu bar, where you can select Add a Printer. In the list of options, select the option ‘Create a new port’. In the drop-down list, choose ‘Standard TCP/IP Port’. After you’ve done this, enter the IP address of the printer and select the driver.
You may also be able to share a printer with other PCs on your network. If you’re a member of a Homegroup, your printer will automatically be shared with the rest of the PCs in your network. You can print it from any PC in the Homegroup.
Then, you can connect your printer to your network by going to the ‘Printer’ tab in the Devices and Printers window.
To add a printer to your network, you need to select it in Devices and Printers. Right-click on the printer and click Add. Once the printer is added to the network, it will be listed in Devices and/or Printers. Once you’ve chosen the location, you’ll need to install its driver.
You’ll then need to connect it to the network. After that, you’ll need to add a few more devices.
Once you’ve connected the printer to the network, you need to add it to the network. You can also share a printer between PCs that belong to the same Homegroup.
Process to connect the Printer:
In order to connect a printer to the network, you should be able to select it in the device manager. Adding a printer in a Homegroup is easy and requires no special knowledge. You need to click on the “shared printer” icon in Devices and Printers to enable it.
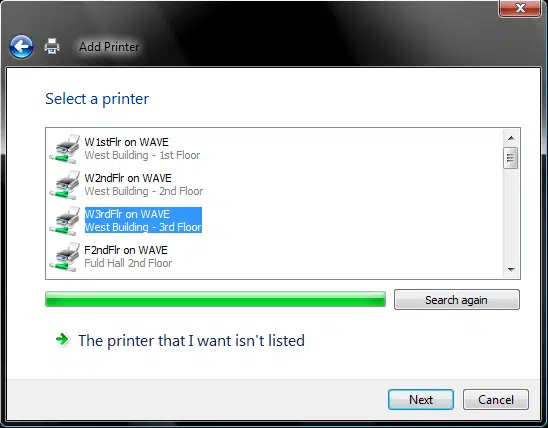
The first step in connecting a printer to the network is to select the printer from your network. Then, select it and click on Add.
You’ll be prompted to enter the name of the printer. If the printer is already listed, you can then choose it and select it. Alternatively, you can add it by its TCP/IP address. If the printer is not listed, you can add it by its name or by its network path.
After ensuring that your printer is connected to the network, you can easily install the printer driver.
To do this, click on the wireless icon and then select ‘Network and Sharing Center. Then, click the Add Printer button. In a few minutes, you should have the printer running. If you’ve chosen the same printer as your homegroup, you should also be able to connect to the printer.


Add comment