

Table of Contents
How to Connect Solar Panels to Battery?
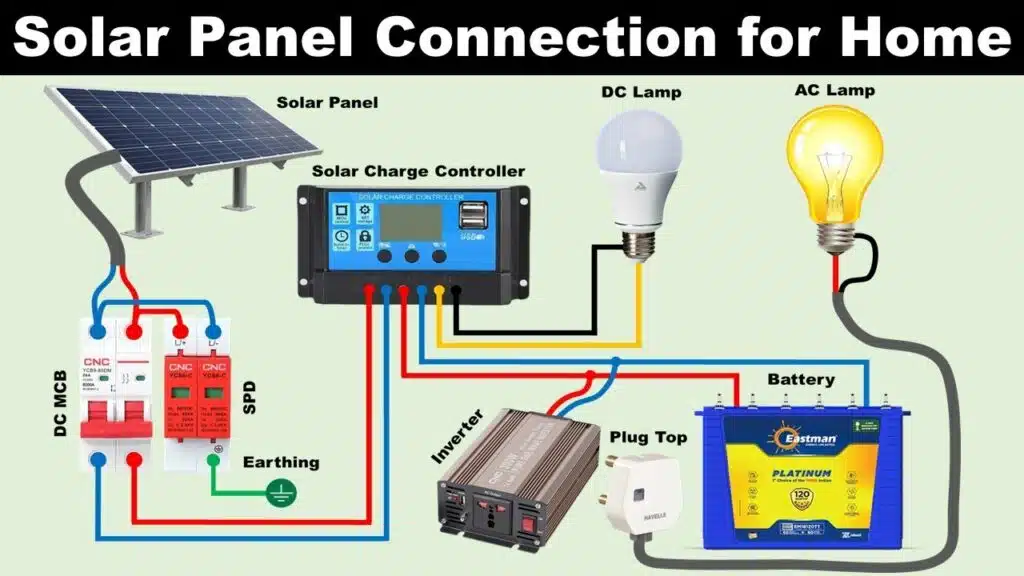
How To Connect Solar Panels To Battery? Solar panels and batteries work together to produce energy. To keep them both safe and efficient they must be connected via a charge controller and inverter.
You can connect a battery directly to a solar panel if you are using a lead-acid battery (not lithium). However, this will damage the battery over time. This is because electricity can back feed into the panel at night or during bad weather.
Wire Size:
The wire size needed for solar panels to battery systems depends on the amount of current. (Amps) and the total distance of the wiring. Using the correct wire sizes helps to ensure that the wires can safely be carried. The required current while maintaining minimal voltage drop and preventing overheating.
The best way to determine the proper wire gauge. To use a Wire Gauge Calculator. Which will give you the minimum and maximum wire sizes for a given length of cable. The calculator is very easy to use and will help you calculate the correct wire size for your system.
For example, let’s say you have a 100-watt 12 V solar panel with a VMP of 18 Volts. You would need a wire that is at least 14 AWG to avoid voltage drop when running the power from your solar panels to your charge controller.
The wires coming from your solar panels will typically come fitted with MC4 connectors which are long cylindrical fittings with a male and female side. These are what you’ll use to connect your solar panel to your charge controller. You can find MC4 connectors wherever you buy electrical or solar supplies, and they’re usually sold with instructions on how to attach them to the bare ends of your wires.
Positive & Negative:
While you could connect solar panels directly to batteries (assuming the batteries are 12v types), this is not recommended as it can cause a large short circuit. The battery should be connected to a charge controller for safety and to help protect the batteries from over-charging or undercharging.
The negative and positive electrical connections between a solar panel and a battery are made using MC4 connector cables. You can purchase these from any local electrical supply store or online. MC4 connector cables are long cylindrical fittings with male and female ends. The male end is used to connect to the terminal on the solar panel and the female end is used to attach to a MC4 adapter cable that leads to the charge controller.
Once you have the MC4 adapter cable and inline fuse, you can start to make your connection. First, connect the negative solar panel cable to the MC4 negative terminal on your charge controller and then attach the positive solar panel cable to that same terminal. You should be able to feel and hear the solar panel terminals snap into place.
Use a voltmeter to check the polarity of your solar panel. To do this, put one probe of the voltmeter on each of the two terminals or wires from the panel. If the voltmeter shows a negative number with a plus symbol (like -1) this means that the leads are in the wrong direction. The polarity can be corrected by flipping the meter leads over.
Stringing in Series:
When a solar panel string is wired in series, it will increase the current of each panel while maintaining the same voltage. For example, if you have three 18-volt, 6-amp panels in a series string, their combined output will be equal to one large panel. The positive terminals of the individual solar panels are connected to each other and to the negative terminal of the battery.
During normal operation, a solar MPPT controller will regulate the voltage from your panel array to match that of the battery bank without sacrificing power production. The MPPT controller will keep the solar array’s voltage within the specified range by monitoring each panel individually and adjusting as needed. This is why it is important to set up the MPPT controller properly – it will be much more effective than a standard PWM control.
Remember that your battery stores the electricity that is produced by your solar panels, so it must be sized appropriately to accommodate your energy usage. Start by determining the wattage of all your appliances and multiply it by how many hours per day you will use them. This will help you determine how long your batteries need to last, which will in turn tell you how many solar panels you need. Always connect the battery terminal wires to the charge controller FIRST, then connect the solar panels to the charger.
Stringing in Parallel:
Solar panels connected in parallel are wired together by connecting the positive terminals to one another. And the negatives to another wire. This can be done in a variety of ways but for smaller systems. It will often be accomplished with the use of branch connectors. These are essentially little Ys with two inputs for positive that change to one and two outputs for negative. Which changes to another.
This connection type is preferred over the series arrangement for several reasons. First. It allows for the use of a lower gauge wire because there is less amperage involved. Making the wiring job easier and cheaper. Second, it safeguards the system from shading issues. If panels are connected in series. One panel that is shaded will affect the entire string; however. If they are wired in parallel this problem is eliminated.
Both the parallel and series connections work well with most solar charge controllers. But to get the maximum performance out of your system it is important. That you understand your battery amp-hours and the wattage ratings of your panels. Once you do. You will be able to determine whether or not it is best to connect your solar panels in series. Or parallel and choose the right gauge wire for the job. Finally. Don’t forget that long strings of solar panels generate a lot of volts and can be dangerous. So be careful and use caution when working with them!


Add comment