
Table of Contents
Connect to Azure Virtual Desktop
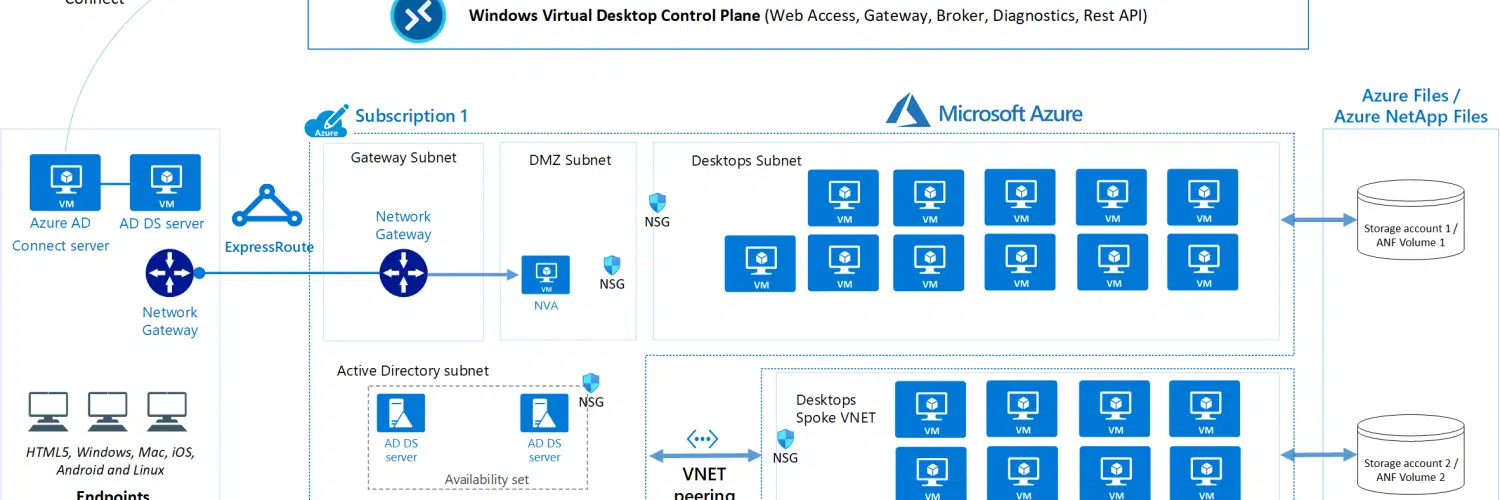
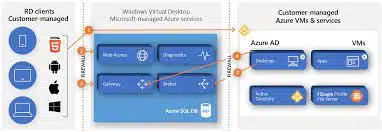
The first step in configuring your virtual desktop is to connect to your Azure Active Directory domain controller. This process is called domain-joining.
To do this, you must configure your domain controller to use Azure AD Connect. Additionally, you must configure your VM to use a Point-to-Site VPN.
User profile encapsulation Connect to Azure Virtual Desktop:
When you connect to Azure Virtual Desktop, you’ll experience seamless roaming of user profiles. The service leverages FSLogix profile container technology, which allows users to roam between VMs while keeping their profile data local.
In addition to providing user profile backup, FSLogix profiles also make it easier to manage session host updates through images. To support FSLogix profiles, you’ll need to deploy an SMB file share in the same region as your session host VMs.
When you connect to Azure Virtual Desktop, you must ensure that the session host VMs have an OS disk attached.
This disk can be either a Premium SSD, a Standard HDD, or an Ephemeral disk. However, the OS disk size is up to you. If you’re on a tight budget, you can use cheaper HDD disks.
Before you can set up an Azure Virtual Desktop connection, you’ll need to install the Azure vNet application on your server. This will enable you to use Azure’s domain controller and custom DNS servers.
Azure will also be able to access your firewall and routing resources, including AD. Users can also access their profile data by using the credentials they previously provided in their local domain. Moreover, Azure vNet will validate your AD credentials automatically.
Host pool configuration:
If you’ve configured a virtual machine, you can set a host pool for your virtual machine. You can also change the default shutdown time for the virtual machine, and you can disable auto-shutdown. To configure a host pool, you can use the Azure portal.
First, you must configure your subscription. Then, choose the appropriate resource group. After that, select the region where you want to store your Azure Virtual Desktop metadata.
This region will also store your virtual machine’s metadata. In addition, you can configure the virtual machine’s location to be in a different region from the host pool.
You can set the host pool configuration to be pooled or dedicated. Pooled pools allow multiple users to connect at once, while dedicated pools only allow one user to log in at a time. In addition, you can configure the number of concurrent sessions per host.
Active Directory Domain Services integration Connect to Azure Virtual Desktop:
The Azure AD join feature allows you to easily integrate Azure Virtual Desktop with your Active Directory domain services. This feature works with both personal and pooled host pools.
Users on both types of pools can also access on-premises resources. Its benefits include simplified management and deployment. It also allows you to enroll your VMs in Intune and support local user profiles.
In order to use the Azure AD integration with Azure Virtual Desktop, you must configure the Azure vNet to connect to your Active Directory domain controller. In order to do so, you need to use the credentials of a Tenant Creator account. You can do this by either opening a Windows popup or a command prompt.
Once the credentials are entered, you can create your Windows Virtual Desktop tenant. It is important to note that the Windows Virtual Desktop tenant ID must match the tenant ID and subscription ID you have on the Azure portal.
You must ensure that the Azure AD DC has the proper permissions for storing domain-based information.
The Azure DC can also replicate your on-prem AD and load balance authentication traffic. If your on-premises network goes down, you can set up a domain-joined Azure DC. You can then use Azure’s powerful features to manage your Azure AD environment.
Accessibility from non-agency endpoints:
In the Azure Virtual Desktop (AVD) portal, you can define which devices can access the AVD resources. These devices can include Windows PCs, Apple macOS, and various mobile devices.
The policies governing which devices can connect to the AVD are based on the device’s ownership. For BYOD devices, the policies may be more restrictive, such as requiring a supported platform or HTML5-compatible browser.
Generally, Azure service resources that are secured using a virtual network are not reachable by users on a company’s internal network. If you need to provide access to a particular resource from a different location, you can enable a private endpoint. A private endpoint uses a private IP address that is assigned to the service.
You can choose from two load-balancing options when you deploy Azure Virtual Desktop. One method is a breadth-first load balancer.
This distributes the users evenly across the pool of session hosts. Another method is a depth-first load balancer. The latter allows new connections to be directed to the next host. This is the preferred method for consistency in load balancing.


Add comment