
Table of Contents
How To Connect RJ45 Socket To Cat6 Cable?
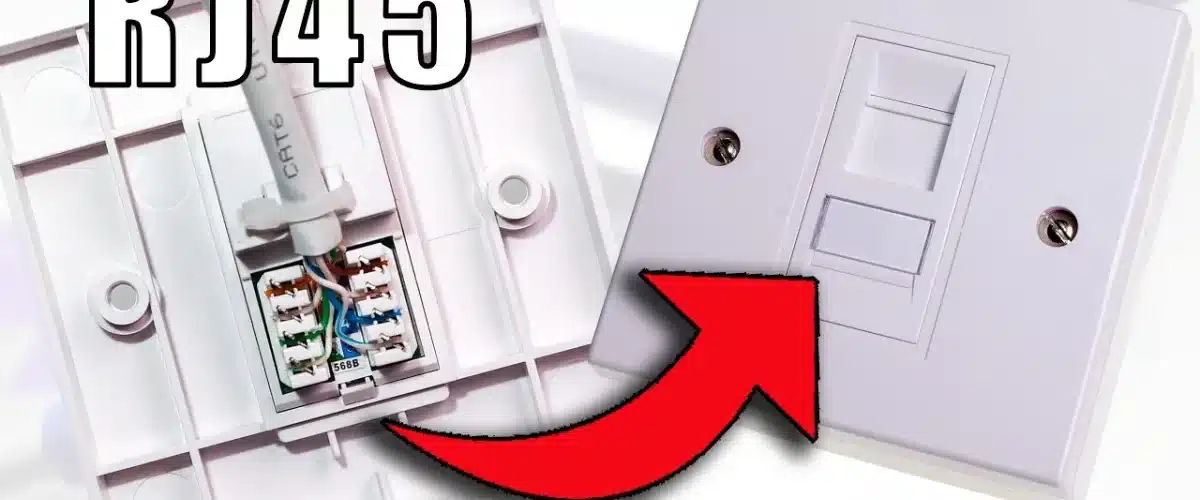
How To Connect Cat6 Cable To RJ45 Socket? RJ45 connectors are modular. Sets of fittings are found on either end of an Ethernet cable that joins two networked devices. These connectors are also referred to as plugs or registered jacks.
When choosing the right cables for your network, make sure they meet TIA/EIA-568-C standards. This will ensure that the data transfer rate is optimal.
Cut the Cable:
To ensure a good connection, make sure that the sheathing is inside the data plug’s end. This will help strengthen the signals and keep them away from hindrances that could reduce their speed. If the sheathing is not fully inserted. Pinch it slightly higher and slide towards the connector to move it further in.
It is also important to choose the right cable length. A longer cable will decrease the signal strength and speed, while a shorter one will increase it. The ideal length for a Cat 6 cable is 55 meters. This will allow it to support a maximum speed of 10 Gbps over that distance.
Next, you must prepare the wires for insertion into the RJ45 connector. This involves stripping the copper wiring to free the inner twisted. Pairs and organizing them according to their layout in the jack pinout. You will need a pair of wire strippers that can handle different cable gauges, along with a high-quality cable crimper. It is advisable to buy these tools from a reliable online supplier. So that you can be sure of quality and durability.
Strip the Copper Wires:
Whether you’re setting up a home network or working on a professional installation, connecting an RJ45. A connector to a Cat6 cable is essential for ensuring high-speed and reliable data transfer. While it may seem daunting at first. Following the steps outlined in this article can help. You make an efficient and effective connection that will ensure minimal data loss.
The first step is to cut the cable to the correct length. This can be done with side cutters or a wire stripper. Once the cable is cut, the next step is to strip the outer jacket back a prescribed amount. There are special strippers available that will make this process quick and easy.
After stripping the outer jacket, you’ll need to remove the insulation from each copper wire in the cable. This can be done using a sharp pocket knife. Start by cutting through the insulation at one end of the cord and slowly. Slice down to expose the copper conductor underneath. You’ll want to be careful not to gouge or nick the copper, as this could cause the cable to fail.
Organize the Wires:
When crimping the RJ45 connector onto the cable, it’s important to properly organize the wires. This step will ensure that all the wires are correctly seated within the connector, and will create a secure connection with the socket. First, trim the ends of the wires to the appropriate length, then organize them by pairs, according to the T568B wiring scheme.
Once all the wires are properly arranged, insert them into the slots of the RJ45 connector. Be sure to align the pins correctly, and apply enough pressure to firmly seat them. Finally, crimp the connector using your crimping tool, and test it to make sure that all the wires are properly seated inside.
If you want to add additional lines to your Ethernet network, you can purchase a splitter that has an RJ45 port on one end and 2 RJ11 ports on the other. These adapters are available in various versions, so you’ll need to be sure that the splitter follows the same pinout as your wall jacks. This can be verified by checking the packaging or consulting a network cable tester.

Insert the Wires:
To terminate the cable, first cut through the outer sheath with a pair of side cutters to expose the bare conductors. Grip the white nylon ripcord with a pair of pliers and pull it firmly down. This will peel back the sheath and expose about 13mm (1/2 in) of the conductors.
Once the wires are exposed, arrange them according to the T568A or T568B wiring standard you are following. Remember to keep the pairs twisted until you reach the termination point – leaving more than about 1/2″ untwisted can jeopardize data transmission performance.
Then insert the hot (red) and neutral (black) conductors into their respective terminals on the socket. The red (old cable color = brown) live conductors should go to the brass terminal and the black (old cable color = grey) neutral wires to the silver terminal. Once the wires are in place, tighten the screw and you’re done. Long dangling wires sticking out of the wall can pose a fire risk so it’s best to make sure everything is tidy. You should also ensure that the socket is properly fixed to the pattress box.
Crimp the Connector:
If you’re running a CAT6 cable, it’s important to follow the proper wiring standards. This will ensure that the cable can support high-speed data transmissions and provide maximum performance for your network. The first step is to measure and cut the cable to the correct length. It’s usually a good idea to leave a little bit of extra slack in case you need to make future repairs or adjustments.
Once the wires are properly trimmed, they should be inserted into the RJ45 connector. Make sure that each wire is seated correctly to establish a strong, reliable connection. Then, crimp the connector using a crimping tool. Be careful not to apply too much pressure, as this could damage the connector or the wires.
Once the connection is complete, you can test it using a LAN tester. This will help you identify any errors that may have occurred during the process. If you find any problems, you can easily fix them before they cause a serious outage in your network. Using a LAN tester can also save you time and money, as it’s less expensive than hiring a professional to troubleshoot your system.


Add comment