
Table of Contents
Can’t Connect To This Network on Windows 10?
WiFi Can’t Connect To This Network Windows 10? The “Can’t connect to this network” issue can be extremely frustrating, especially if it prevents you from accessing the internet. Luckily, there are several ways to fix it.
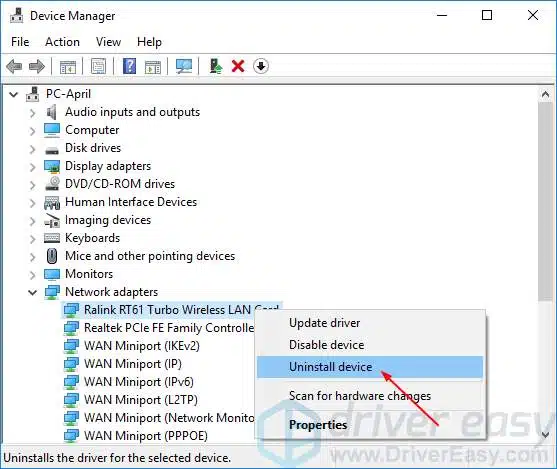
One way is to update your network driver. To do so, open the Device Manager and navigate to Network Adapters. Right-click the adapter and select Uninstall device.
1. Uninstall and Reinstall the Network Adapter:
If your Windows 10 laptop can’t connect to the internet, it’s likely because there’s an issue with the network adapter. The good news is, That there are a few simple fixes that you can try to resolve the problem and get back online.
The most common cause of this error is that the driver for your network adapter is outdated. In most cases, this can be fixed by simply updating the driver. To do this, open the Device Manager and expand the Network Adapters section. Right-click on your network adapter and select the Uninstall device option. Once the driver has been uninstalled, reboot your computer and let Windows reinstall the latest version of the driver.
Another possibility is that your wireless profile has become corrupted. To fix this, open CMD (or run Command Prompt from the Start menu if you have admin rights) and enter the following two commands one at a time:
You may also want to try forgetting the network if it’s giving you trouble. This can help if you’re connecting to a public Wi-Fi network. If you’re using a Wi-Fi connection at work or in a restaurant, for example, many of these networks have caps on the number of devices that can connect to them. To forget the network, click on the Wi-Fi icon in the taskbar and select Forget this network.
2. Run the Network Troubleshooter:
The Network Troubleshooter is a tool in Windows that can help you resolve problems with your wireless connection. It will detect and fix the underlying cause of your problem, so you can get back online. To run the Network Troubleshooter, open the Settings app and select “Troubleshoot”. Then, select Network Adapter and follow the instructions to solve the issue.
Incompatible or outdated network adapter drivers are another common cause of this error. You can try to manually update your driver by opening the Device Manager, expanding Network Adapters, and then right-clicking on the installed driver. Select Uninstall and follow the prompts to remove the driver. Once you restart your computer, Windows will automatically reinstall the basic network adapter driver and you should not experience this error anymore.
Another software issue that can cause WiFi Can’t Connect To This Network is malware, which can corrupt your network settings and prevent you from connecting to the internet. To avoid this, you should scan your computer and devices for malware, as well as regularly install Windows updates. You can also use platforms like Downdetector to check for outages caused by weather or disasters that could affect your connection. If none of these work, talk to your provider about getting your service restored.
3. Check Your Network Settings:
If your computer can’t connect to WiFi even though it is in range, then there might be something wrong with the network settings. You can try changing them to see if it fixes the problem.
First, check whether Airplane mode is enabled. You might have accidentally turned it on in Action Center or another program, and if so, disable it. Next, open Device Manager by pressing Win + X or using the Cortana search. Right-click the network adapter and select “Properties”. If it’s a wireless network, click Advanced Options. Then, uncheck the option “Allow this device to turn off to save power”.
You can also try disabling IPv6 on your computer if you are experiencing this issue. This is not necessary for most connections, and you can disable it by following this guide.
Lastly, you can try updating the driver for your network adapter. This is an easy way to fix this problem, and you can do it with a free driver download and update tool, such as Driver Talent. This program can automatically detect your outdated drivers and then provide you with the latest version for you to install. You can download and use it for free by clicking the button below. Or, if you prefer, you can also purchase the Pro version of this software to automatically download and install all the missing and outdated drivers on your Windows 10 computer with just one click.
4. Forget the Network:
It’s not uncommon for Windows 10 computers and laptops to encounter glitches when connecting to a network or the internet. In most cases, when this error occurs, it’s accompanied by a myriad of other errors, making it difficult to diagnose and fix the problem.
While it’s convenient for your computer to save your network profiles and sign you in automatically, over time this can lead to problems if other devices on the same wireless network change their passwords or the WiFi connection becomes unstable. This is why it’s sometimes helpful to forget your network connections, which can help resolve the “Can’t connect to this network” error.
To do this, open the Settings app and select ’Network & Internet’. Click on ‘Manage known networks’ and select your WiFi network from the list, then click Forget. This will erase your network profile and reset all the associated settings. Once you’ve done this, you can try connecting to the network again.
If the above methods don’t work, try restarting your PC in safe mode and updating all outdated drivers using a driver update tool like Auslogics Driver Updater. This method is fast, easy, and guaranteed to resolve your issue in no time!


Add comment