
Table of Contents
How To Connect Dryer Cord To New Outlet?
How To Connect Dryer Cord? Switching out an existing dryer cord for one that matches its new outlet is a relatively straightforward home improvement project. Involving only unbolting three screws and taking down an access panel to expose it. Its terminal block with wire connections attached directly to its cord.
Cord wires are often color-coded to make identification easy. Then simply make the necessary connections between the cord and its connections.
Features Of Connect Dryer Cord
- At some point in their lives, most homeowners will encounter the need to connect a 3-prong dryer cord to a 4-prong outlet or vice versa. This project can be accomplished easily with basic tools and common sense alone. Some key considerations must be kept in mind for proper installation of dryer cords as well as meeting local electrical codes.
- Always choose a new, manufacturer-approved cord when replacing an existing one. Reusing older cords increases the risk of electrical shorts and safety hazards, potentially increasing electrical shorts further.
- Utilize the correct voltage when operating your dryer to avoid damaging it and nullifying its warranty. Failing to do so could void your agreement and expose you to costly repairs and fines from manufacturers.
- Before beginning this project, ensure you unplug and remove the plate that covers the wire connections on the back of the dryer. With that done, it should be easy to see the terminal block which holds cord wires.
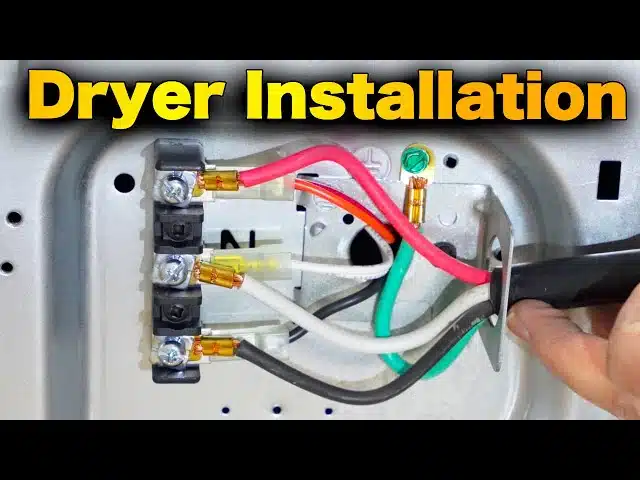
- Terminal blocks usually consist of three main connectors: red and black hot terminals as well as a neutral terminal connected by a white wire that connects it with a grounding strap or cord via green screws.
- To create a four-prong cord, simply connect the red and black wires from your cord to their respective terminals on a terminal block. Connect the green one to its grounding screw. Be careful when tightening screws securing wires to the terminal block. Overtightening can damage cords and terminal blocks while under-tightening can result in loose wire connections and safety risks.
Remove the Electrical Cover Plate
Many older homes feature three-prong dryer outlets. When homeowners move to newer properties with four-slot outlets. Their older 3-prong cords may no longer plug into these outlets due to changes in electrical code which now requires all cords to have both ground. Neutral wires for safety reasons. Luckily, it is simple and inexpensive to upgrade an older dryer cord into a 4-prong one so it fits properly into its newer outlet.
Begin by unplugging the dryer and taking steps to dismantle its cover plate which conceals wiring connections on the back panel where the cord enters the outlet. Most cover plates feature screws for securement – use a screwdriver or nut driver to loosen and remove these as soon as possible, before setting aside.
First, loosen and open up your terminal block to reveal the cord’s wire terminals. Carefully observe which colored wires connect the cord – usually black, white, and red ones; and notice which is color-coded accordingly. Black and red in particular – at either the left or right of the center (neutral) terminal of the terminal block.
Once the cord is wired, reinstall its strain relief and cover plate as protection. Plug the cord into its outlet to test that all is functioning as intended.
Disconnect the Old Cord
Your dryer likely uses a four-prong plug that fits into a four-slot outlet. Safety and efficiency, as this requires only four wires to power it; the electrical code mandates four wire cords with dedicated ground wires to use one with your dryer; it’s much simpler and cheaper to change out its cord than change out its in-wall receptacle!
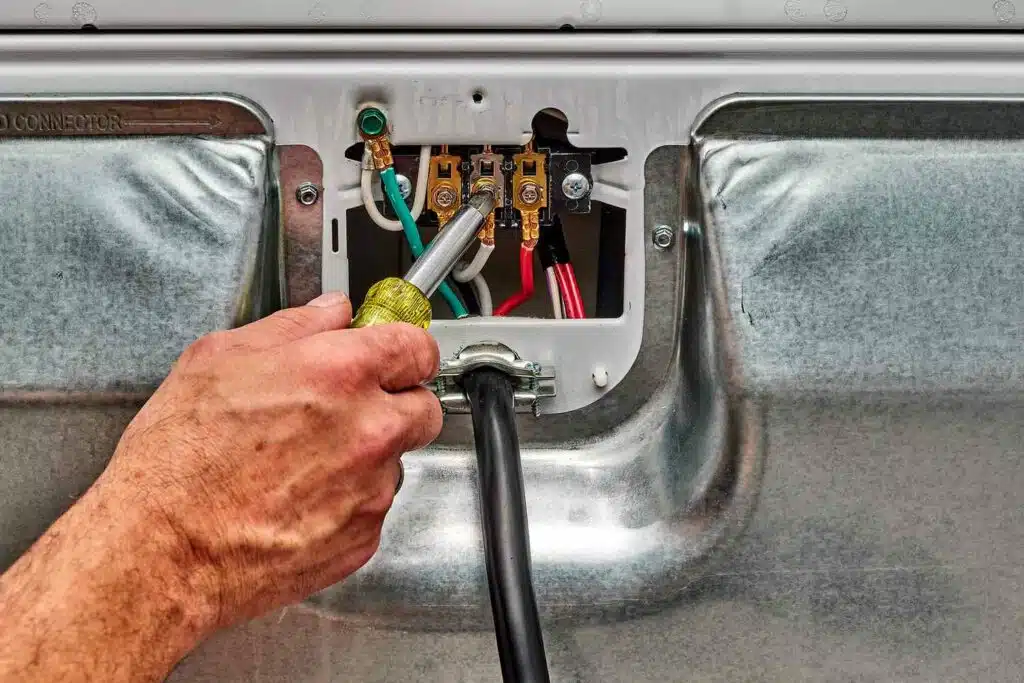
Locate and remove the access panel on the back of your dryer to expose its terminal block. The terminal block is a metal panel connected to your dryer that contains three outer terminals for hot cord wires, as well as one center terminal that serves as a neutral cord or grounding strap connection point. Loosen any screws holding wires together on this metal plate before taking note of their positions about its wires.
If the terminals are color-coded, you can match up the wire colors. The replacement cord to those found on the old one. Once done. Disconnect and pull away from the terminal block; also disconnect the brass strap or white wire connecting the center terminal and dryer case. Although not necessary, it’s best to disconnect old cord connections before starting; failing this may result in fire hazards or electrical shock risks during operation.
Connect the New Cord
Homeowners may feel confused when moving into a house with different outlets or purchasing a dryer without an adaptor cord, but changing to four-slot outlets and four-prong cords is a straightforward project most can handle themselves. Just ensure you adhere to manufacturer instructions and safety precautions when working with electricity!
Start by opening the access panel on the upper back of your dryer and removing its terminal block access cover. Before taking care to disconnect all wires from the terminal block connection screws and strip about 1/2 inch of insulation off each end of each wire before taking note of their positions. Identify color-coded wires before connecting the new cord accordingly.
Connect the white wire of the cord to the center screw on the terminal block, while connecting both black. Red cord wires to either the left or right terminal screws, interchangeably. Tighten each terminal screw tightly to secure all electrical connections securely.
Secondly, Check for metal tabs connecting the ground screw to the case ground. Otherwise, configure it to accept four-prong cords; this configuration prevents open neutral from electrifying the metal case of the dryer and minimizes fire risk.
Attach the Strain Relief
If your outlet only supports three prongs. Converting to four prongs requires installing a four-prong cord that features two hot wires. Neutral and ground wires to separate current flow – providing an option to return any unused current into circulation and potentially prevent an electrical fire from starting.
Start by turning off the power to your dryer and removing its access panel where the cord enters from the back. Next, loosen any screws from a plate holding electrical cover screws. As well as any connection screws connecting wires to terminal blocks.
With a screwdriver, remove and set aside the old cord. Next, identify all wires connected to the terminal block and note their positions. Carefully strip about half an inch of insulation off each cord wire before separating into individual wires. Connect one of the black terminal screws on your new cord’s black wire. The white neutral terminal is on its center neutral terminal. Its green terminal screw or grounding strap (if available).
Install the strain relief bracket into the cord access hole and securely tighten its screws. This part must be installed as it prevents wire connections from becoming loose, leading to short circuits or sparking when an appliance is turned on for use.


Add comment