
You can use your car battery to power a line of LED strip lights. This is a great way to extend your car’s battery life and save money on electricity.
However, you should always connect your LED strips to a 12V battery because higher voltages can damage the light.
Table of Contents
How to Connect Led to Battery:
A battery is a big deal in the automotive world. It powers all the high-tech gadgets and gizmos that you see on today’s roads.
But a battery can be finicky, especially if you don’t have the right tools and equipment on hand. Luckily, there are many ways to get the juice flowing.
One of the easiest ways is to use a jumper cable. The best part is that you can reuse the cable for a number of different projects. In addition to supplying power, the cable can also act as a safety measure.
Using the right cables can save your car from a potential fire hazard and prevent the dreaded flat tire.
The cable can also be used for other electrically powered items such as lighting your garage or adding some much-needed oomph to the back of your truck.
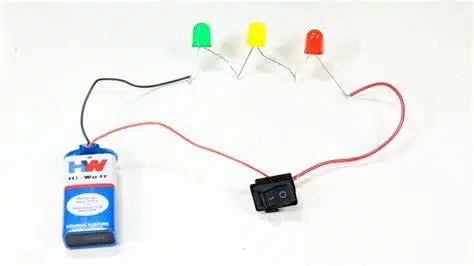
How to Connect Led to Battery Resistor:
A resistor is an essential part of a circuit to limit current flow. So, especially when using low-current electronic components like LEDs. Without a resistor, the current flowing through LEDs will cause temperature runaway and eventually destroy them.
When a resistor is included in a circuit, it is often represented with a symbol that incorporates both. The usual battery symbol and a separate resistance symbol for the component’s internal resistance.
This symbol is useful in situations where the battery’s resistance is a factor. But where the component is otherwise neutral (or zero) compared to other parts of the circuit.
As mentioned earlier, resistors are usually connected in series, which means one resistor goes before another resistor.
The positive battery terminal is then connected to the resistor’s positive side and the negative terminal goes to the resistor’s negative side. Then the current flows from R1 to R2 and back to the battery.
Connector:
One of the most daunting parts of experimenting with LEDs is connecting them to the battery, but it’s not impossible.
You can either buy a kit with the right connectors in it or you can try your hand at it yourself. Using the right connectors will make your life a lot easier and save you some cash in the process.
There are plenty of connectors to choose from, and the best ones are made for the job. A high quality one will last a lifetime and the best part is you don’t have to be an electronics expert to figure out how it works.
In short, a well designed connector will keep your battery safe from dust and damage and it will allow you to plug in the latest gadgets in style.
Getting it right can save you a fortune in the long run and help you get your project completed on time and under budget.
Ground:
Many inexperienced car audio installers misunderstand the importance of grounding and . So, connect a ground wire for their LED light bar relay directly to the battery.
This can cause a number of problems that include voltage fluctuations, damaged ignition coils, and even headlight bulbs that fail to light.
In order to properly ground a system, you must connect a negative terminal on a battery to an unpainted metal part of the vehicle’s chassis or engine block. That connection is called a ground strap or a ground cable.
This connection is essential to ensuring that electricity can flow safely from the battery, through the vehicle’s electrical circuits and then back into the battery. Without it, stray voltages will cause sparks, fires and other dangerous issues.


Add comment