
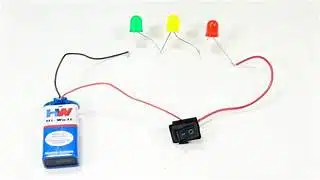
LEDs (light-emitting diodes) are electronic semiconductor components that emit light when electrons flow through them.
They are available in different shapes, sizes, and colors. A single battery can power them for hours.
Start with a piece of paper, then use copper tape to draw the lines of an electrical circuit. The copper tape conducts electricity, so it will connect the battery to the LED light.
Table of Contents
Connecting the Positive Lead:
Before installing the battery, take the time to find where the positive and negative cables connect.
Usually, the caps on each terminal will be marked and color-coded. A red cap indicates a positive terminal, while the black one represents a negative terminal.
Disconnect the positive cable first, if possible. This will prevent any contact with the negative cable, which could create a short circuit or even cause an electrical arc.
To disconnect the battery terminal, loosen the lock nut using a wrench and pull the cable off. You may need to use WD-40 on the bolt if it’s seized and will not turn.
To make sure you don’t accidentally reconnect the battery, mark the connection with a piece of tape or something else to identify it as off.
Also, try to keep the two cables apart or tied up somewhere out of the way so they do not touch each other. This will help prevent any electrical shorts and potential injuries.
Connecting the Negative Lead:
When working with batteries and electrical devices, it’s important to follow the manufacturer’s instructions or standard electrical safety practices.
One of the most important safety precautions is to disconnect the negative terminal first before connecting the positive terminal.
This minimizes the risk of sparking and helps to prevent damage to sensitive electronic components.
Typically, the battery’s positive terminal is labeled with a plus (+) sign, and the negative terminal is marked with a minus (-).
Find the nut on the negative terminal and loosen it using an adjustable wrench or socket wrench. Then, remove the nut and cable from the terminal and set it aside.
To reconnect the battery, release the red positive cable from its cable clamp and slide it onto the positive terminal. Secure the connector and double-check that it’s tightened.
Then, repeat the process with the black negative cable. Once both cables are disconnected, be sure to zip-tie them to something non-metallic to prevent them from swinging around and touching each other.
How to Connect Led to Battery Replacement the Ground Lead:
There are many reasons a car battery may fail, but one of the most common is a bad ground wire.
It can cause arcing between the cable and the terminal, which reduces the amount of energy the battery sends to the car. To test if your ground wire is working properly, use a multimeter to measure continuity.
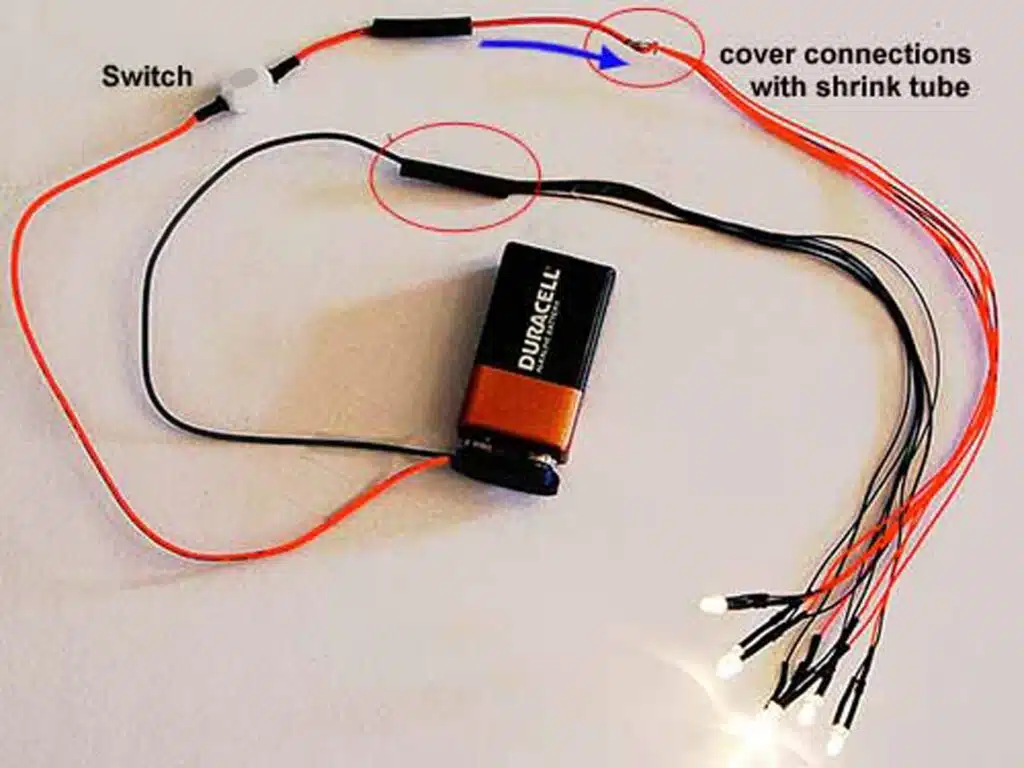
Before you start working on your battery cables, you need to prepare a few materials. These include cable terminals, new quality battery cables, heat-shrink tubing, and anti-corrosion spray.
You should also make sure you have all the tools you need to complete this project, including a pair of pliers, a screwdriver, and a wrench to separate the battery.
If you have a top-post battery, you will need to loosen the bolt that holds the positive terminal. If the bolt will not budge, try using some WD-40 to loosen it up. Be careful not to cut any of the cable wires while you do this.
How to Connect Led to Battery Replacement the Battery:
Once you’ve determined the voltage of your LEDs, select a resistor value that will allow 15mA of current to flow across it (Vr) minus the maximum battery voltage (Vbatt) and take off the insulation from both ends.
Solder the longer lead of the resistor to the positive terminal on the battery, and the shorter to the ground wire you’ve brought in close proximity — but not touching it.
Wearing work gloves and eye protection, loosen the lock nut on the negative battery cable by slowly loosening it with a wrench. Remove the cable and push it far aside so that it cannot come into contact with the battery again until you’re ready to reconnect it.
Clean the tray, battery posts, and connector hardware with a baking soda water solution or automobile-safe lubricant to prevent corrosion. Make sure the new battery fits securely in the tray before you close up the clamp and secure the nut.


Add comment