

Easily power an LED strip using the included LiPo USB Charger. Just plug the battery port’s DC output into your project’s barrel jack and enjoy about an hour of runtime.
The charger can be powered from a standard A or mini-B USB connector (pins 1, 2, 4, and 5). It is designed for single-cell Lithium-Polymer batteries only.
Table of Contents
1. Connect the Battery How to Connect Led to Battery Charger with USB:
Also, The board connects to a standard USB plug via pins 1, 3, and 4. Pin 1 delivers +5VDC, pin 3 forms the ground that also connects to the shield, and pin 4 is used for a data line that only carries current (and voltage) when charging.
The USB IC has a programmable charge current feature. Which can be set from the PROG pin to either 500mA or 100mA. There is an onboard red LED that can be used to indicate battery charging status.
If you want to add your own project output LED. There is a small unpopulated 0.1″-pitch header directly behind the JST connector that can be soldered for this purpose.
The IC does the USB enumeration for itself, so it can take on a power source without requiring system software to manage the process.
This is possible because the IC uses a hardware test to determine port type before sending out the initial data exchange for enumeration.
2. Connect the Battery Charger:
Also, The charger can accept power from a barrel jack (5.5mm outer diameter, 2.1mm center pole, center positive) or a USB Mini-B plug.
The pins on the plug that supply +5V (pin 1) and ground are connected to the charger. The charger regulates these power supplies to provide the correct current for charging a battery.
Also, This USB-based charger features a self-enumerating charger IC, which takes care of battery charging without the need for system software to manage the process. It also has a programmable charge current feature that you can set with an external resistor.
Our board’s red charging LED can be used to indicate when the battery is charging and when it is fully charged.
For easy embedding inside your project. There is an unpopulated 0.1″-pitch header directly behind. The JST connector can connect to wires or other connectors.
The onboard SYS OUT output allows you to connect your project. The battery supply voltage (somewhere between 3.6 and 4.2V) or even power a 3.3V Arduino Pro!
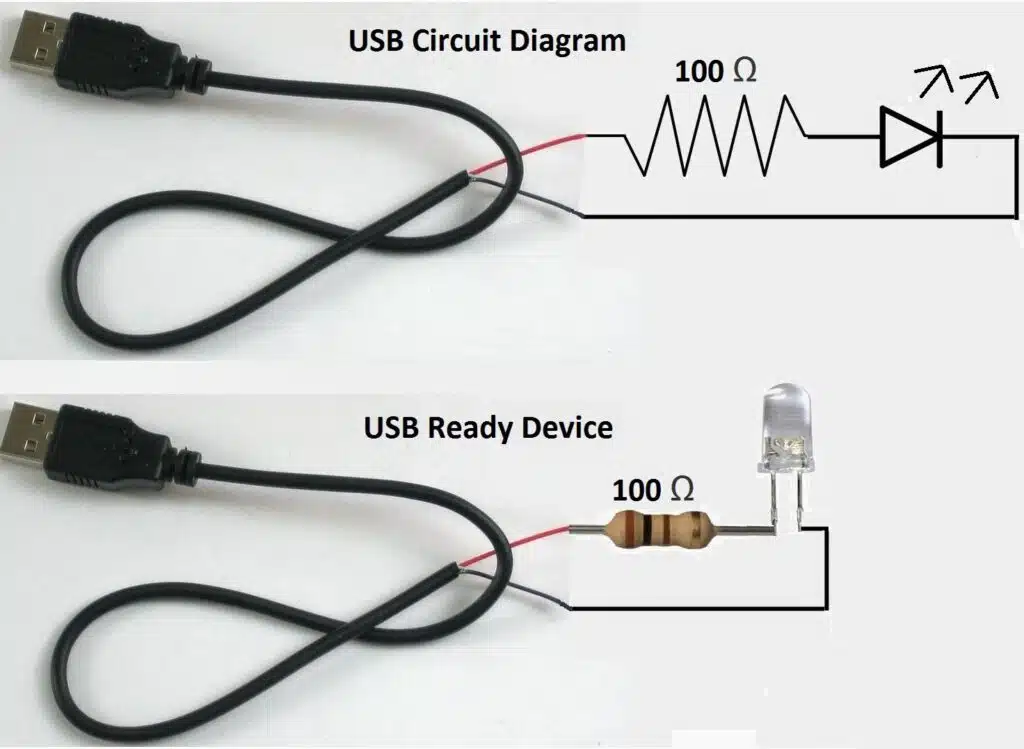
3. Connect the LED:
The onboard red LED is intended to give you a visual indication of the status of your battery (Charging or Discharging).
You can use the onboard JST connector or the nearby 0.1″-pitch header to connect your own 3mm or 5mm LED in its place.
Also, Remember to connect the LEDs in series with a current-limiting resistor so they last longer and are less sensitive to variations in the USB supply voltage.
These supply inputs also need to be connected to the SYS OUT output to power your project from the battery pack supply.
The SYS OUT output is tied directly to the battery, so the voltage of your battery (3.6-4.2V) will be supplied to your project.
4. Connect the LED Charger How to Connect Led to Battery Charger with USB:
Also, The LEDs are connected in series with a current-limiting resistor. This layout allows us to accommodate a good number of LEDs depending on the application. Each LED drops 2.1 volts through the resistor.
The value of the resistor determines how bright each LED is. Experiment with different values to find the brightness you want.
Also, The battery charger with USB provides a regulated output of about 3.6 – 4.2V, which is enough to power our LED strip. The onboard red charging LED can be used to monitor the status of the battery.
The SYS OUT output on the charger is connected directly to our project. One end of the wire is plugged into the charger port marked “DC Output. The other end of the wire is plugged into the barrel jack end of the LED strip.
The DC cable is a standard male-to-female connector and can be found in most computer stores. The battery can provide about a full hour of continuous illumination of an entire LED strip on a full charge.


Add comment