
Table of Contents
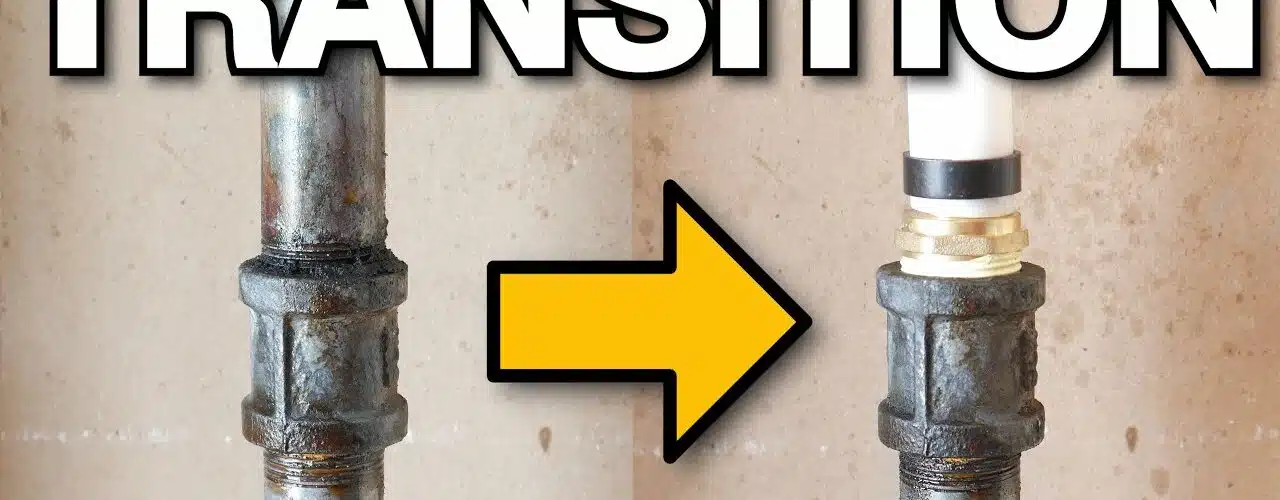
How To Connect Non-Threaded Galvanized Pipe To Pex Pipe?
How To Connect Non-Threaded Galvanized Pipe To Pex? The typical lifespan of galvanized water pipes is up to 50 years. Despite this, they often develop mineral build-up that causes clogs and lowers water pressure.
When connecting galvanized non-threaded pipe fittings, use couplings that create a sealed joint. The type of coupling used and the installation procedure are important so that the pipes do not leak.
Features Of Connect Non-Threaded Galvanized Pipe To Pex
- The conversion from traditional copper or metal pipe to PEX (cross-linked polyethylene) plumbing can save home and business owners money on water utility bills, while preventing the costly clogging and damage associated with galvanized pipes. Making this type of plumbing upgrade requires careful planning, adherence to building codes, and professional installation techniques that ensure the system is safe, durable, and functioning properly.
- To connect new PEX lines to existing galvanized plumbing, a PEX clamp-ring connection adapter is required. This adapter has a female threaded inlet for the old galvanized pipe, and a barbed male end to connect the new PEX line. Before installing the connector, use a steel brush to clean the threaded end of the galvanized pipe. Wrap white sealing tape twice clockwise around the thread and screw on the adapter by hand. Then, screw a PEX tubing coupling over the adapter’s female threaded inlet and push the PEX line over the barbed male end of the adapter. Tighten the fitting by hand with a crescent wrench.
- Before starting to connect the galvanized and PEX plumbing, it’s important to shut off the water to that part of the system. Also, it’s a good idea to spray some penetrating oil on the threaded areas of the galvanized pipe that you will be working on to help loosen up any corroded fittings. Finally, it’s a good idea to have a bucket or canister ready to catch any water that might be spilled during the replacement process.
Choose the Right Coupling
When you’re connecting galvanized pipes, the coupling you choose must properly seal the joints. To do so, it must fit the pipe’s diameter and have a smooth surface. Ideally, the coupling should also be made from metal that can withstand the pressure and temperatures you expect it to handle.
Start by using a tape measure to determine the width of both pipe ends. If they’re the same width, use a common connector; however, if the widths differ, consider getting stepped couplings that gradually increase in size to match each pipe’s diameter. If the pipe’s surface is rough, be sure to grind it down or get a coupling designed for bumpy surfaces.
Another factor to take into account when choosing a coupling is its torque rating. Couplings are rated by their ability to withstand a given amount of torque over a certain number of cycles. This rating may be based on calculations or the results of manufacturer testing. Whatever the case, the higher the rated torque capacity, the stronger the coupling.
Although no piping system lasts forever, many homeowners find that their galvanized pipes are nearing the end of their functional life span. In such a situation, replacing the galvanized pipes with new, more durable materials is the best solution. A plumbing professional will help you decide which replacement piping material is right for your home and install it accordingly.
Check the Pipe’s Diameter
Whether you’re a homeowner making a repair or a plumbing professional, choosing the right coupling is key to a well-sealed joint. If you use the wrong coupling, it can lead to leaks and a host of other problems.

To select the correct coupling, you need to know the pipe’s diameter. To do this, use a tape measure to check each pipe’s width. If the pipes’ widths match, you can use a common coupling. If they don’t match, you’ll need to use a stepped coupling that gradually increases in size to fit the wider pipe.
You may also be able to use a push-fit fitting, which is easy to install and doesn’t require any tools. However, these tend to be 5-10x more expensive than crimp rings or cinch clamps. Plus, they are not permanent and will likely break or crack over time.
You can also try a quick and easy test to see if the pipe is galvanized. Simply take a screwdriver and scratch the surface of the pipe. If it’s galvanized, the scratched area will look copper-colored and will stick to a magnet. Alternatively, you can use a caliper to measure the diameter. Just keep in mind that PEX has a smaller inside diameter than copper of the same nominal size. Also, the pipe’s actual diameter can be difficult to determine because it is measured by circumference instead of by length.
Check the Pipe’s Surface
The galvanized pipe’s surface might be rough or smooth, which can affect the fitting’s grip on the pipe. Choose a coupling that accommodates rough pipe surfaces (or has a smooth-finish option).
Also, look at the pipe’s diameter. If it is oversized, you will need to install a larger-diameter coupling or a compression fitting.
In most cases, if you’re installing PEX to replace galvanized pipe, you can use a threaded transition fitting to connect the two systems. The trick is to shut off the water supply and drain the lines, then install the appropriate fitting.
When choosing a fitting, it’s best to match the connection method to the PEX manufacturer. Mixing materials could void the PEX manufacturer’s warranty and possibly cause leaks or other problems.
Clamp fittings require the use of a crimping tool to tighten steel rings that compress on the ends of the pipe. Push-fit fittings are a little easier since they don’t require any tools at all. If you’re using a clamp or push-fit fitting, be sure the end of the galvanized pipe is clean and free of kinks. If you find a kink, heat it with a heat gun and cover the area with an abrasion clip to prevent it from re-kinking. You should also leave a loop at the end of long runs to allow for contraction and expansion of the PEX supply line.
Check the Pipe’s Squareness
No piping system lasts forever, and many homes’ galvanized pipes are nearing the end of their useful life span. Those old pipes are still safely in use, but they aren’t ideal for new plumbing configurations. To avoid costly repairs, replace them with a Pex pipe.
Using a caliper or even a piece of sewing tape, measure the circumference of the pipe’s surface. Then, choose a coupling with the same diameter. If the diameters are different, use a stepped coupling that increases in size to fit each pipe.
Look at the galvanized coating of each pipe to determine whether its surface is rough or smooth. If the coating looks and feels textured, you need a coupling manufactured to accommodate rough surfaces. Otherwise, a standard coupling should be fine.
Before Connecting the non-threaded pipe, level a carpenter’s level against its end to check that it’s square. Cut the end if it’s not flush and remove any rough edges with a metal sander before proceeding. It’s also a good idea to wipe down the area with a cloth and water-based degreaser to remove any dirt that might interfere with a tight seal between the coupling and the pipe. Once the pipe is in place, tighten the fastening bolts until they click evenly and securely. This will ensure a strong, leak-free connection that stands up to the pressure and temperature fluctuations of a home’s plumbing.
Conclusion
PEX is one of the newest pipes in the plumbing industry. It has many benefits, including reduced water hammer and expansion, as well as an easy installation process.
First, prepare the pipe for soldering by cleaning it with a wire brush or emery cloth. Then, apply flux and heat the area to be soldered.


Add comment