
Getting your printer to connect to WiFi on a Mac is a simple process. All you need to do is follow these steps.
The first step is to check whether your printer is capable of connecting to Wi-Fi. If not, you can try to use a wired connection method.
Table of Contents
Wireless Setup How to Connect Printer to WiFi on MAC:
If you want to print documents and photos from your MAC computer without using any wires, you can set up your printer to connect to WiFi. This is usually faster and cheaper than wiring the printer to a PC.
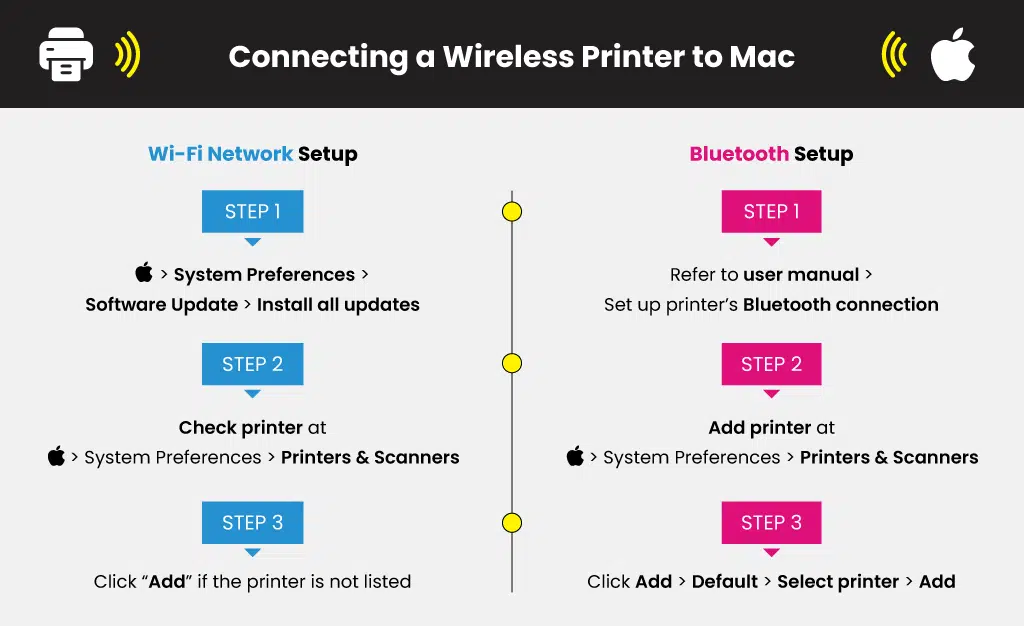
Before you can connect your printer to a Wi-Fi network, you must first install the correct software for the printer. This is usually done via the printer’s menu interface and can vary by brand.
You can also use Bluetooth to connect your printer to a Mac. If your Mac came with Bluetooth built-in, or if you have a USB Bluetooth adapter, this can be set up easily.
If you have a wireless printer, you can connect it to your Mac by following the instructions in the user manual or on the manufacturer’s website. Some printers have their own wireless setup process, while others require you to plug them into a USB port on your computer before they can be used wirelessly.
Bluetooth Setup:
Bluetooth is a wireless technology that allows multiple devices to connect with each other. This technology is widely used in various electronic devices such as cell phones, laptops, computers, wireless headsets, and gaming consoles.
Bluetooth also allows for wireless printing on many devices. It also provides a low-power connection that requires less energy for operation.
There are a lot of Bluetooth-enabled devices around the world, and they all use them for different purposes.
Some of the most popular include mobile phone hands-free headsets, wireless speakers, and even car stereos.
You can even connect your Bluetooth mouse to your computer or smartphone. It’s a great way to share files with other people easily and quickly.
To connect your printer to a Mac, you can use the printer’s USB port or you can purchase a Bluetooth adapter that will convert the USB port into a wireless one. Once you have these items, you can follow a few simple steps to make the connection.
USB Setup:
USB is an interface that allows a host computer to connect a range of peripheral devices, such as printers or scanners.
It transfers data between the devices using ‘packets’, which are a fixed number of bytes that contain information about the device.
USB can also be used to transfer files between computers without a network connection. This is particularly useful for copying documents from one computer to another, or for transferring data from a hard drive to a USB storage device or portable external hard disk.
To set up your printer for wireless printing on a Mac, start by adding it to the list of printers in System Preferences. From there, choose the Printers & Scanners option. Select the printer that you want to add and click the + sign to add it.
Network Setup:
If you have a MAC computer, you can connect your printer to your network through WiFi. This is a great option for people who don’t have Ethernet ports in their homes or offices.
Once you’ve configured your printer to connect to your network, all computers and mobile devices on your network will have access to it.
You can set up your printer to connect to your Wi-Fi router using WPS (Wi-Fi Protected Setup). This method is easy to use and requires no additional software or drivers.
Alternatively, you can configure the Ad-hoc mode of your printer with your PC or Mac. This is the easiest way to get your printer connected to your Wi-Fi router.
First, confirm that your Wi-Fi access point/router has the WPS symbol. Next, press and hold the (Wi-Fi) button on your printer for about five seconds.


Add comment