
Table of Contents
How To Connect To A Printer On Mac?
How To Connect To A Printer On Mac? Printers connect via USB, but you can also print wirelessly with Bluetooth or Ethernet. The process for connecting your printer to your Mac is the same regardless of which connection method you choose.
First, update your Mac to the latest version of macOS. This will ensure that macOS recognizes your printer when you plug it in.
USB:
The USB ports on your iMac allow you to connect various hardware devices to your computer, including printers. Depending on the printer model, you may need to install software before using it with macOS. For example, if you have an HP P-touch printer, you can download the latest software package from the HP Printer Support website and install it on your computer. Once the software is installed, you can connect the printer to your iMac and print documents or images.
Most modern printers are compatible with macOS and can be connected wirelessly or via USB. However, you should check the manufacturer’s website to make sure that your printer has the drivers required for macOS. If your printer does not have the drivers for macOS, you will need to download them from the manufacturer’s website.
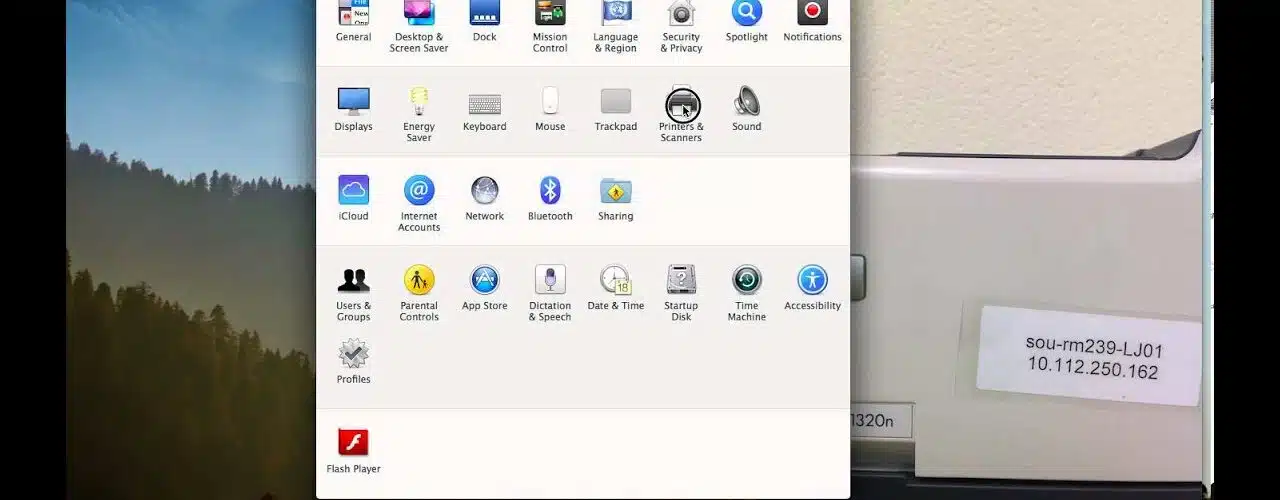
Once you have the appropriate drivers, you can add your printer to macOS by opening System Preferences and selecting Printers & Scanners. Select your printer from the list and click the plus sign button. MacOS will automatically gather information about your printer, and if it is a network printer, will offer to install any necessary drivers.
You can also connect your printer to macOS by entering its IP address in the “Add Printer” menu in System Preferences. You will need to know your printer’s IP address to do this, but the printer’s manufacturer should have documentation on how to retrieve it.
Wi-Fi:
When a printer has wireless network capabilities, you can connect it to your Wi-Fi network instead of using a USB cable. If you’re unsure whether your printer has Wi-Fi, check its user manual for instructions on how to set it up. Make sure that your printer and Mac are both connected to the same Wireless network. If they aren’t, you’ll need to connect them via a USB cable and install the drivers that came with your printer or on the manufacturer’s website.
To use a printer over Wi-Fi, select it from the list of available devices in System Preferences or Printers and Scanners (on older Mac computers). Click Add to download the necessary drivers. If your printer has any special accessories installed, you may need to specify them in a dialog that appears after adding the device.
If you’re using an AirPrint-enabled printer, it should “just work” from here. You can even share it over Wi-Fi so that other people can print it, too.
However, if you’re connecting to a non-AirPrint printer, you’ll need to go back to System Preferences or Printers and Scanners and add it manually, as explained below. In either case, you should also check the printer’s status by clicking the Status button. If it’s off or offline, you’ll need to reset the printing system to get it working again.
Ethernet:
If you’re on a wired network, plug the printer’s Ethernet cable into an available port on your router. You may need to wait a few minutes for the printer and your router to renegotiate their Ethernet links. Then, follow the on-screen instructions to download and install the latest printer software.
You can also connect a wired printer via USB, but the process isn’t as straightforward. You’ll need to know the printer’s IP address or MAC address, which you can get from the printer’s on-screen menus. You’ll then need to add the printer as a network printer.
When you’re done, the printer should appear in the Printers & Scanners list on your Mac. You can change the default print job options from the printer’s on-screen menu. You can also select which users can use the printer and set their privileges.
Before connecting a printer to your network, make sure it’s updated to the latest version of macOS. This will help ensure that your Mac recognizes the printer automatically when you plug it in. If the printer isn’t recognized, you can try restarting it and making sure it’s on the same network as your Mac. If that doesn’t work, you may need to download additional macOS drivers for the specific model of your printer. You can find these in the App Store or on your device manufacturer’s website.
Bluetooth:
If your printer is Bluetooth-enabled, you can use the built-in wireless printing feature on your Mac. This process will work whether you are on the same local network or using a direct connection. The first thing to do is make sure that the Bluetooth printer and your computer are both powered on. Then, go to System Preferences and click on the Printers & Scanners icon. This will allow your Mac to gather information about the printer. Once the process has finished, you can add the printer from this window.
You can also connect your printer to your computer via a USB cable. In this case, the Mac will automatically detect the device and download the necessary software. You should only need to do this once. If you are unsure how to set up your printer, consult the owner’s manual for instructions.
Another option is to use a wired Ethernet connection to your printer. This will give you the best performance, especially if you have a lot of prints to print. It will also eliminate any issues caused by a poor wireless connection.
Some printers can connect through NFC, which uses a short-range wireless communication technology to pair devices. You can check if yours supports NFC by looking at the manufacturer’s website or contacting customer support. Once the Printer is connected to your computer, you can open the file you need to print and follow the prompts on the screen to print the document.


Add comment