
Table of Contents
How to Connect to Printer Using IP Address in Windows 10:
You can connect to a printer through the Internet with your printer’s IP address in Windows 10. First, open the Control Panel and look under the Devices and Printers section. Click on the Web Services or Ports tab to see your printer’s IP address.
The printer driver uses a TCP/IP port and a Web Services for Devices (WSD) protocol to connect to the Internet. You can also open a Command Prompt and look for a network device.
How to add a network printer in Windows 10:
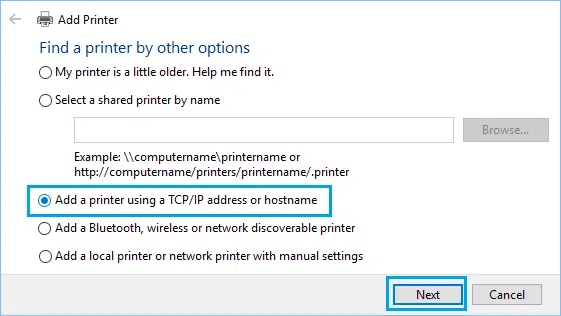
The first step in adding a network printer to Windows is to find its IP address. This can be done by using the Control Panel’s Devices and Printers option.
You can also scan the nearby IP addresses with a third-party app. Once you have found the IP address, click the Add button.
Now, you should be able to choose which printer you want to connect to. You can choose whether you want to share or not share it with other computers.
The printer driver is in the Drivers section. Then, connect the printer to the network. You should then see a printer wizard on the screen.
You can also manually add the printer by going to the Control Panel and typing in the printer name. You should also check the “Set as default printer” checkbox.
Finally, click on the “Finish” button in the bottom-right corner. This will open the Devices and Printers window. After that, wait for the printer to be installed. If it is not, choose the option not to share the printer.
How to assign a static how to connect to a Printer using IP address Windows 10:
If you’re having trouble connecting your printer to your network, you can change its IP address to a static one.
Most printers use a dynamic IP address, which is not ideal for organizing your network. To change the printer’s IP address, follow these steps.
First, open Control Panel and navigate to Network Connections. From there, choose the printer to that you want to assign a static IP address.
Click the Properties button next to the printer’s IP address. You can also find the IP address on the printer’s properties page.

Next, go to the Network Configuration report in the Network Settings window. Click on IP Parameters and select static.
You can then enter your current IP address as the subnet mask. Once you’re done, click Save and your printer should restart with a static IP address.
Once you’ve selected a static IP address, you can choose whether or not to share your printer with other computers. This is important if you want to share files and printers with others or if you want to use port forwarding.
While dynamic IP addresses are temporary, static IP addresses are permanent. This makes it possible for you to reserve a specific IP address for future use or for research and development.
How to print network configuration page on printers:
To print the network configuration page for your printer, first, you need to find out its IP address. To do so, go to the Control Panel, Devices, and Printers.
There, you can check your printer’s IP address using the “Web Services for Devices” tab. The IP address is the address that your printer uses to connect to your computer over a TCP/IP connection.
If you cannot find the IP address of your printer, look in its properties or register ports. This information can also be found through third-party apps that scan nearby IP addresses.
Once you’ve found it, click on the printer and choose Print Network Configuration Page to start printing.
After selecting the printer, click on the properties tab. You will see the IP address and other settings. Look for “Web Services for Devices” and “IP Configuration” in the IP configuration tab.
If the IP address does not appear, change the setting from Automatic to Manual. In addition, you can change the network from Auto to Static. After you’ve done so, your printer will use its IP address.


Add comment