
Table of Contents
How to Add a Network Printer in Windows 10 For Sharing:
If you want to set up a network printer in Windows 10 for sharing, there are two main steps you need to follow. First, you need to understand the difference between local and network printers.
A local printer is one that is installed on a single PC, while a network printer is connected to multiple computers via a special network port.
How to set up a shared network printer in Windows 10:
To share a printer with other computers on the network, you must first install the appropriate driver on the computer you wish to share it with. The primary computer must also be connected to the same network and router as the remote computer.
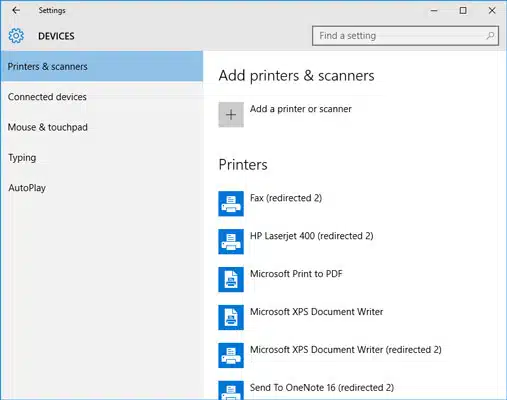
You can start the process by pressing the Windows + I keys on both computers and selecting Settings. Go to the Printers and scanners section of the Settings panel. Click the Share this printer option in the Printer properties window.
Once you have a shared network printer installed on your PC, you can then print from multiple computers. To share a printer, first, connect to the printer through a network connection.
From there, click the printer icon. Windows 10 will prompt you to enter a path to the drivers. Click OK to save the settings.
Next, connect the printer to your computer via a USB or power cord. Once connected, Windows will search for the printer and begin installing the necessary driver software. If the printer is not listed in the list, you can use the troubleshooter to fix the problem.
Adding a network printer to a computer:
There are two main ways to add a network printer to a computer on Windows 10. The first method is to connect the printer to your computer.
This can be done using a serial or parallel port. The second method uses a wireless connection. You should choose the method that matches your printer and network connection.
To add a network printer to a computer, go to the Windows menu and click on “Network Connections”.
Choose Change advanced sharing settings from the left panel. Next, select “Network discovery” and “File and printer sharing.” Click Turn on these settings to make the computer visible on the network. After that, click Save Changes at the bottom of the screen.
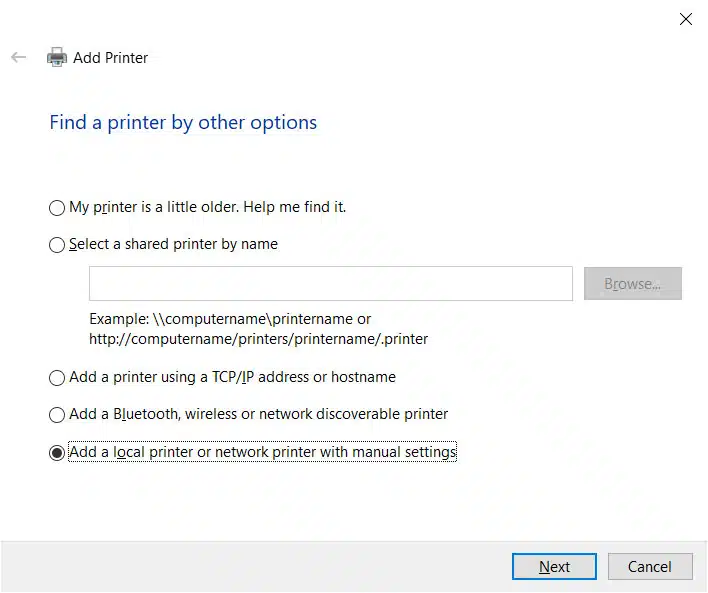
Adding a network printer to a PC in Windows 10 is much easier than the previous method. First, you need to find the printer’s IP address. Once you have the IP address, you can add the printer to your computer.
When you add a printer via a network, Windows 10 will scan for nearby printers and will ask you to install the printer’s drivers. If you’re having trouble configuring your network printer, you can try to run the printer troubleshooter. Most new printer models have a troubleshooter that can help you troubleshoot any issues.
Setting up a default printer in Windows 10:
In Windows 10, you can set a default printer for your system. To do this, open the Start menu and type “Control Panel” in the search box.
Then, double-click the “Printers and Scanners” icon and then select the printer you want to use as the default printer. When you print a document, the system will send the print command to the default printer.
After setting up your default printer, you can use it at any time. You can print using the Print dialog box, or you can choose File, Print. Then, click ‘OK’ to print.
This will make the default printer the one you use most often. Then, you can use the printer without any hassles.
Depending on your needs, you may have more than one printer connected to your system. If you want to set a default printer for Windows 10, you should choose one that is located in the same location as the printer you use most often. Windows will try to determine the most recently used printer so that it will be the default printer.
Sharing a printer over a network:
To share a printer, the primary computer should have the printer driver installed. Both computers must be connected to the same network or router. In addition, both computers must be switched on.
Launch the control panel from the Windows start menu and go to Devices, Printers & scanners. Select the printer that you want to share. In the Change Sharing Options window, click the Share this printer option.
To share a printer over a network, you must have a Windows 10 PC connected to the printer. If the printer is a USB device, Windows will detect it automatically. For other devices, you must install the driver for the network hub. Then, you can share the printer with other computers on the network.
If the printer does not appear in the Shared Printers list, try rebooting your PC. Once the PC reboots, make sure the printer has a working driver installed. If the printer is still not showing up, try to add it manually.


Add comment