
Whether you’re working remotely or traveling, using a VPN on your laptop gives you access to your company’s private network.
You can set up a VPN connection with the built-in tools on Windows 10 without having to install an extra app or client.
Click the Start menu, then click the “Settings” button (it looks like a cogwheel). Select the option to add a new VPN connection.
Table of Contents
How to Set Up a VPN Connection on Windows 10:
Also, Setting up a VPN connection on Windows 10 is quick and easy. You can use a third-party app or configure the built-in VPN.
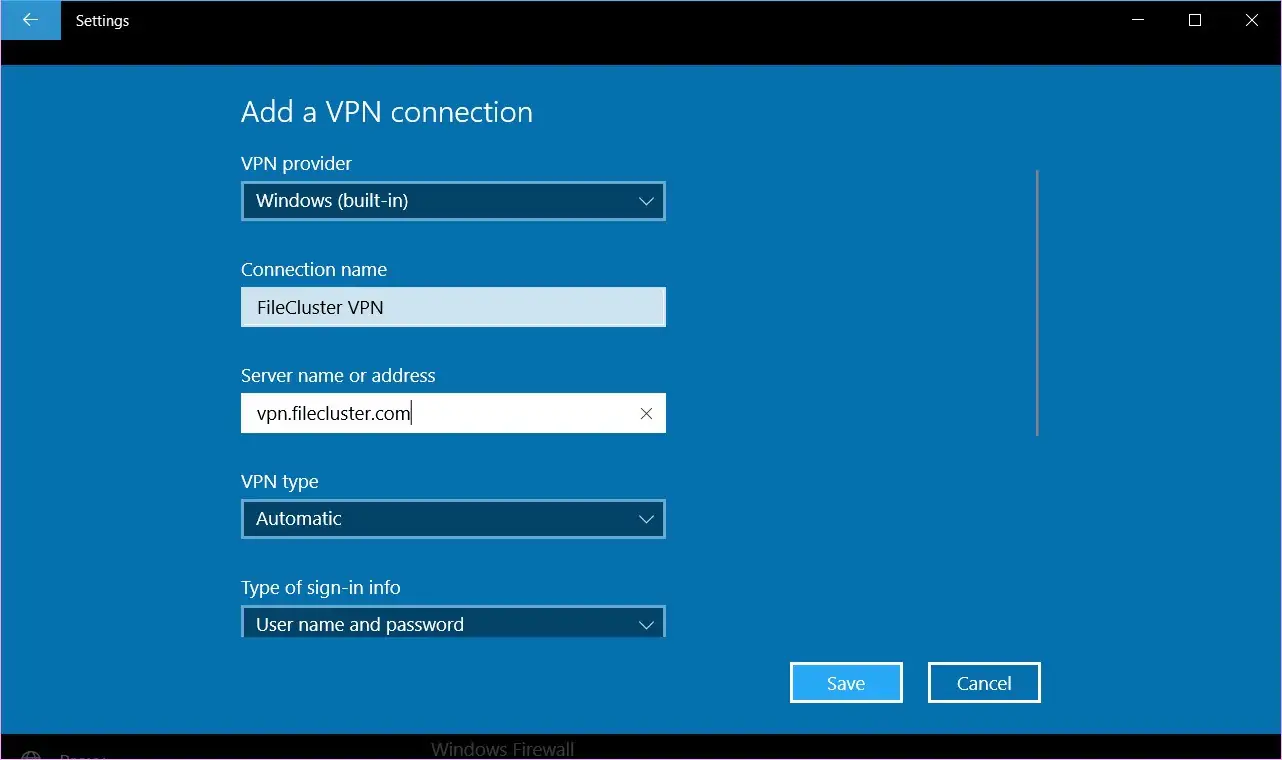
In the Add a VPN connection window, select Windows (built-in), and then enter the required information.
You’ll need to provide the connection name, server address or IP, type of sign-in info, and username and password.
Select the option to have the computer remember your sign-in info for more convenience. Finally, select the VPN connection you created and click Connect.
Once the VPN is connected, you can access the internet securely and privately. Your connection will appear as Connected on the Network & Internet page in the Settings app.
Step 1: Open Control Panel How to Connect VPN to Laptop Windows 10:
Also, If you’d prefer not to use a bloated piece of software constantly running in the background, Windows 10 has built-in VPN support that can be manually configured. This method offers more control over your connection but is a little more time-consuming.
Click the Start button (or keyboard shortcut), and type Control panel. Select Control Panel from the search results, or open it in the Settings window.
On the Network and Internet page, click VPN. In the VPN Connection settings, under VPN provider, select Windows (built-in).
Enter a connection name, server address or IP address, and the sign-in information for your VPN service (usually a username and password). Click Save.
Step 2: Click Network and Internet:
If you don’t have a VPN app installed or want to connect to your CyberGhost connection manually, Windows 10 has built-in VPN support. You need the SSID and key (password) for your hosted network to set this up.
Click the Network and Internet icon, which resembles a wireless signal or computer display. In the menu, click Change Adapter Settings.
In the new window, under VPN provider, select Windows (built-in). Enter a name for your connection and your server or IP address from your Client Area.
Also, choose L2TP/IPSec with a pre-shared key and your password. Click OK. Windows will now save the VPN connection, allowing you to easily connect to it later.
Step 3: Click Change Adapter Settings:
Once a Virtual Network Adapter is created, it remains in the system until it’s manually removed. To change adapter settings for a VPN client, right-click the VPN Network Adapter and select [Properties].
The connection name and server name or address can vary depending on your VPN provider or your employer. You’ll also see a place to enter your sign-in information, such as your username and password.
The datalink speed setting tells Windows how fast the Virtual Network Adapter can communicate with other devices on your network.
This can cause problems if your router has a limited maximum communication rate. If this is the case, you can try to increase the speed.
Step 4: Select the VPN Network Adapter:
To do this, either click the Cortana search bar or button on your taskbar and type vpn or go to Network & Internet > VPN in your settings and select Add a VPN connection.
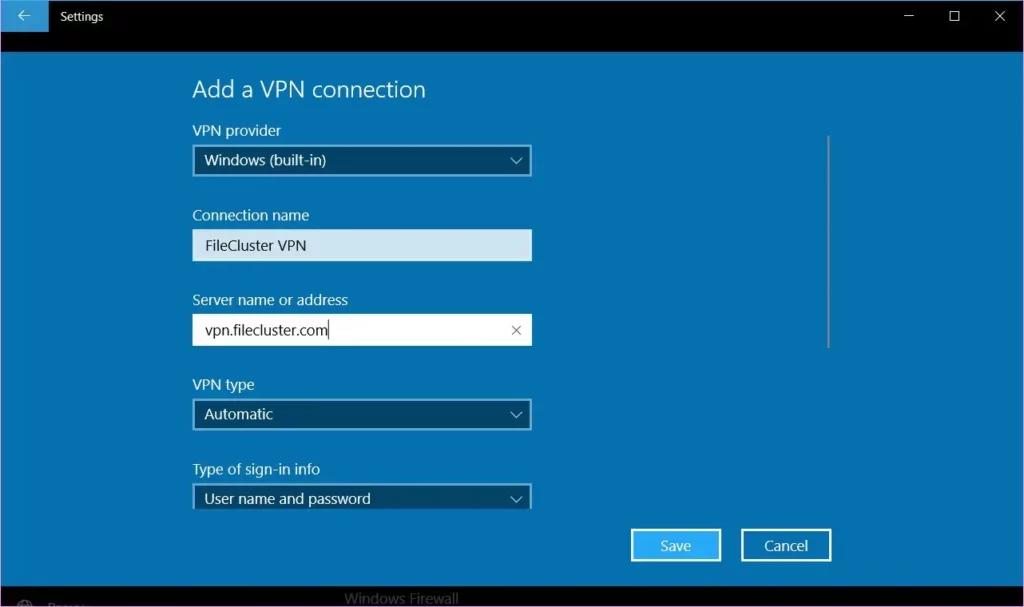
In the new window, select Windows (built-in) as your VPN provider and a server name or address that’s provided by your VPN service. In the drop-down menu below VPN type, select Automatic, and in the Type of sign-in info field, select a User name and password.
You may also want to select a specific VPN server location, depending on what you’re using the VPN for. For example, you might want to choose an American server so that you can watch American Netflix.
Step 5: Click Properties:
The next screen will show several options. In the VPN provider field, select Windows (built-in). In the Connection name field, type any name you want.
Also, In the Server name or address field, enter the server name or IP address provided by your VPN provider. In the VPN type field, select L2TP/IPSec with a pre-shared key.
On the next screen, check the box to save the sign-in information and enter a username and password for extra security. Click Connect to finish the setup.
Once connected, all your network traffic will pass through the VPN connection. This will protect you from malware and viruses, and ensure that you have a secure internet connection.


Add comment