
When you decorate with LED lights, you want to make sure that they’re all connected correctly. This way, they will work properly and look good.
Whether you need to connect two strips together or make a series of complicated setups, there are several options for making that happen.
The most common is connecting them with connectors, but it’s also possible to solder if you want a more aesthetic connection.
Table of Contents
How to Connect Led Lights Power Supply:
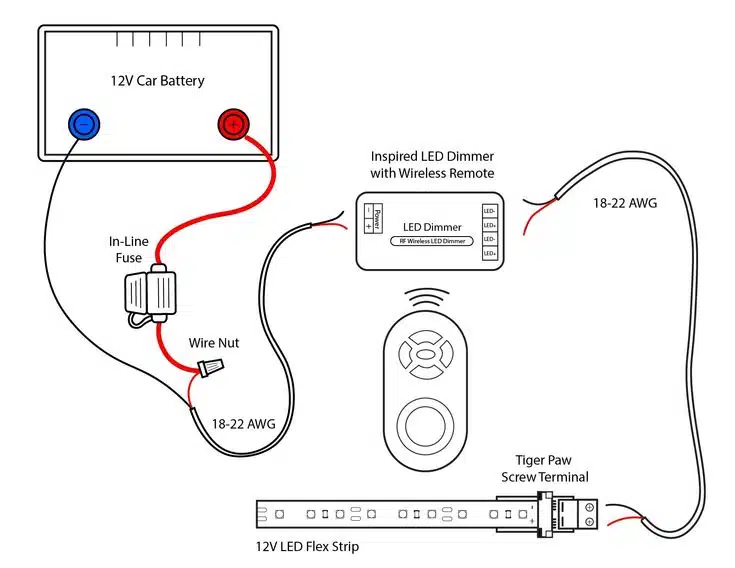
A power supply is the device that converts mains electricity into a lower voltage that your LED lights need to work. In this way, they don’t overheat or fail prematurely.
To choose the right power supply, you’ll need to know what type of LED strip lighting you have and how much power it uses. This information can be found in the product’s packaging or in the product description.
You’ll also want to make sure that the power supply you choose is UL-rated and comes with protection functions.
These features will address risks such as over-currents. So, overheating, and short-circuiting, ensuring that the power supply shuts down if it isn’t safe to use.
If you are installing your strip in a location that is likely to be subject to water, you’ll also want to choose a power supply that is waterproof. Most power supplies are IP67 rated, meaning that they are protected against both solids and liquids.
Connectors:
Whether you are using led strip lights in an indoor or outdoor space, connectors play an important role. They keep the LED tape from bending and help to speed up installation times.
There are a variety of connectors that you can choose from depending on your project needs. The most common are strip-to-strip connectors which will link two lengths of LED tape together without leaving a gap.
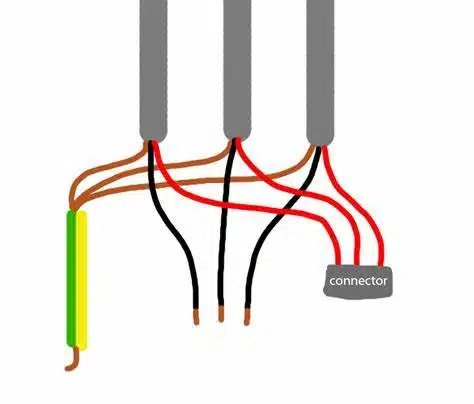
These connectors are available in 2 pin for single color strips, 3 pin for dual color strips and 4 pin for RGB (color changing) strips. You can also find waterproof options that are suited for underwater projects such as pools or water fountains.
To use these connectors, first open the clips and insert the LED strips so that their copper pads are in contact with the metal tongs.
Then reseal the clip. Then, make sure that the positive and negative wires are connected correctly -‘red’ to ‘+’ and ‘black’ to ‘-‘.
How to Connect Led Lights Wires:
The wires used to connect LED lights can be either stranded or solid core. Each type has its own advantages and disadvantages, so choose the right one for your project.
You’ll also need to select the appropriate wire gauge for your system. This can be tricky, as you need to consider the number of lights that are in parallel with your wiring system and how much current you will have to handle.
Another factor to keep in mind is the length of your wire run. Ideally, you should split your run of LED strips into shorter lengths so that the voltage drop won’t be too high.
Once you’ve found the wire that will work for your LED lighting, you’ll need to splice it to your power source. This can be done using a wire splicer or by simply screwing your strip into a connector.
Soldering:
Soldering is a process in which metal parts are joined together using a heat source. This process is used for many different projects and is commonly employed in the electronics industry.
Depending on the application, different soldering methods are used to create a joint. Some of these methods use an induction method. So, which uses copper coils that induce currents in the part being soldered and thereby generate heat.
Another type of soldering is soft soldering. So, which uses filler metals that melt at temperatures lower than those required for hard soldering. This form of soldering can be used to attach small components to a PCB.


Add comment