
Table of Contents
How to Connect Canon Printer to Mac With USB:
If you’re having problems connecting your Canon printer to your Mac, there’s a good chance you’re experiencing USB issues. If so, try resetting the printer.
Also, If this doesn’t fix the problem, try other methods to make the connection work. Readers of this article may have discovered other methods that work for them.
Installing a How to connect canon printer to Mac with USB:
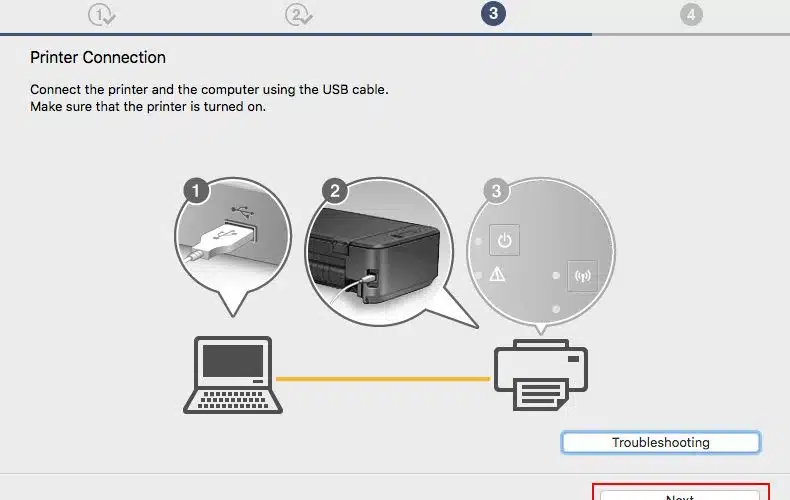
Before you begin the process of installing a Canon printer on your Mac, it is important to make sure that your printer and computer are connected to the same network. You must also be sure that the USB cable between them is properly plugged in.
After the printer and computer are connected, open your computer’s print queue and click on the printer icon. This will display a list of connected and wireless printers.
Click on the printer icon and select “Resume”. If the print job has paused because of an error, click the “Resume” button to resume the printing job.
Once the printer is connected, you need to install the necessary software for the printer. The software for Canon printers is available from the official Canon website.
You will need to enter the model number of your printer to find the right driver. Also, Once you have the right driver, you can double-click the driver file and follow the instructions on the screen. Once the driver has been installed, you can do a print test to make sure it is working properly.
Also, Once you’ve installed the necessary drivers, you can go ahead and install your printer on your Mac. If your printer is not already installed, go to the Canon website to download the latest software.
Once you’ve finished the installation process, connect your Canon printer to your Mac device using the USB cable. From here, you can go to System Preferences and select Printers and Scanners. Select your Canon printer in the list and follow the installation steps.
Troubleshooting a Canon printer:
You can use a computer’s troubleshooting tools to resolve printer-related problems. First, you need to make sure your printer is properly connected to your computer.
To check, plug the USB cable into both the printer and your computer. Also, make sure the printer is turned on. If it does not turn on, you may need to replace the power supply or motherboard.
Next, you need to make sure the driver is up-to-date. You can find the latest driver for your printer on the Canon website. Once you’ve downloaded the driver, make sure to note down the name and the location where you downloaded it.
Then, open Device Manager (type “device” in the Windows search bar and pick “device”). After this, you should click on the printer and right-click on “Install a New Driver” (if it isn’t already installed).
Another common problem that makes a printer unresponsive is a faulty or malfunctioning USB port. To fix this, try a different USB cable.
If the USB cable isn’t working, you can also try connecting it directly to your computer. Avoid using USB hubs to connect your Canon printer to your computer. Lastly, make sure your computer and the wireless router are working properly.
If your PC’s USB port is working, you can try a Bluetooth connection. This will eliminate the need for wires and the installation of new drivers. However, not all Android devices support Bluetooth communication.
If you want to connect your Canon printer to a Bluetooth device, you can install the Canon PRINT Inkjet/SELPHY app. Make sure you enable the Bluetooth feature in your Canon printer first.

Resetting a Canon printer:
If you are having problems printing on your Canon printer, you may need to reset the device. To do this, you will need to hold down the power button and the ‘Stop’ button at the same time. Press and hold the power button for 30 seconds.
After that, you will have to press and hold the ‘Stop’ button four times. Finally, you will need to press the ‘Power’ button one more time to complete the process.
The first step is to reconnect the printer to your Mac. If your printer is connected to your computer, select it from the list of available printers and scanners.
You can also reset the printer from its preferences by clicking on the ‘Reset’ option. This process clears all the data and components associated with your printer. Once the process has been completed, you can proceed to install the printer driver.
After installing the printer drivers, you can now reset the printing system of your Canon printer on your Mac. First, connect the printer to your Mac with a USB cable.
Then, you can use the printer. You can also make changes in its setting by checking the ‘Printer offline’ box and pressing the ‘Reset’ button.
Next, you will need to install the latest driver for your Canon printer. This is available from the manufacturer’s website.
After installing the latest driver, you can turn your Mac back on and reconnect your Canon printer. After that, you should see the printer working properly.


Add comment