
If you have a printer that is offline, there are several things you can try to get it online again. Some of them include resetting the power plugin, changing the drivers, or adjusting the network router.
If none of these work, it could be a problem with the USB cable or network connection. To fix this, make sure both ends of the cable are firmly inserted.
Table of Contents
1. Turn on the printer:
If your printer is offline, it can’t communicate with the computer. This can occur due to a variety of reasons, such as physical damage, network issues, or a problem with the printer’s software.
Check your printer’s documentation for information about connecting it to your Mac. If you can’t find the information you need, contact the printer’s manufacturer for help.
The first step is to connect the printer to your computer using a USB cable. This connection method works with most printers, and it’s the easiest.
Next, ensure your computer and the printer are both on the same Wi-Fi network. This is important for wireless printers, which have their own set of network settings.
Once you’ve connected your printer, try printing a test page to see if it’s working. If it’s not, you may have to restart your computer. Otherwise, follow the instructions in your printer’s user manual to set up the wireless connection.
2. Connect the printer to your computer:
Depending on the type of printer you have, you can connect it to your computer using a USB cable or via Wi-Fi. If you’re using a Wi-Fi printer, follow the instructions in your user manual to set up your network connection.
Windows 10 has a built-in option for connecting your printer to your wireless network. It works by locating your printer’s IP address on your router’s settings menu.
If you can’t find your printer’s IP address, it might be printed on a sticker somewhere on the printer itself. If not, go to your router’s settings menu and look for an option called something like ‘Attached devices’ or similar.
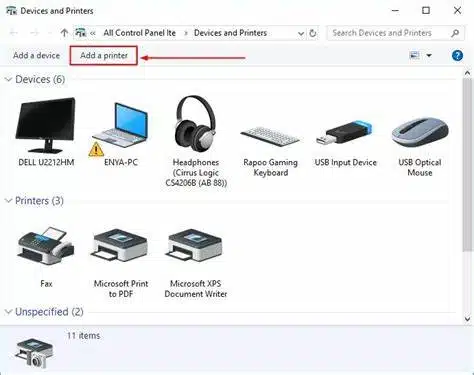
Alternatively, you can add your printer to your Windows 10 list of devices by clicking System Preferences then Printers & scanners.
This will search for your printer and then display a dialog listing available Bluetooth printers on your local network.
3. Connect the printer to your network:
Also, many printers are now wi-fi compatible, meaning they can be connected to a home or work network without wires.
You can then print documents, pictures, or even tools and parts that need to be printed from anywhere in the home or office.
Most printers have a screen with step-by-step instructions for connecting to the network. This process is relatively quick and usually easy to follow – you only need to progress one step at a time.
Your router should also have a set of network settings. These can be found on a sticker at the bottom of your router or in an app that you can install.
The first step is to find out the IP address of your printer. This can be easily done using the network settings menu on your router.
4. Install the printer software:
Also, printer software is the main piece of software that allows your computer to communicate with the printer.
It serves two important functions: it lets your computer understand the hardware specifications of the printer, and it converts print job data into signals that the printer can interpret.
Your printer may come with a CD that contains the printer driver, or you can download it from the manufacturer’s website. Follow the instructions on the CD or download it to install the driver on your computer.
Alternatively, you can use Windows Update or Apple’s App Store to check for and download updated drivers.
Often, missing or outdated drivers can cause problems with the printer, so it’s a good idea to keep your driver current.


Add comment