
Table of Contents
How to Connect External Monitor to MacBook Pro:
When connecting an external monitor to a MacBook Pro, you will need to follow several steps to connect the display.
These steps include Disabling True Tone, adjusting the refresh rate, and finding a suitable cable. Then you will need to configure the display arrangement. If you have any problems, contact Apple support.
Disable True Tone how to Connect External Monitor to MacBook Pro:
Disabling True Tone when connecting an external monitor to your MacBook Pro can be a useful way to make it work properly.
This feature helps calibrate the colors on your display so that it looks more natural. While this is a useful feature, it can also cause problems with color management.
True Tone is a feature available on the latest models of iPhones, such as the iPhone X and iPhone 8, as well as the 10.5-inch and 12.9-inch iPad Pro.
However, if you use an external monitor with a MacBook Pro that is in clamshell mode, True Tone will not work.
If you’re using an external monitor that doesn’t have this technology, you can turn it off in the screen preferences menu.
The screen will continue to appear normal in normal lighting. However, if you’re using your Mac for professional work, it’s best to disable True Tone to ensure your work is as clear as possible.
Adjust refresh rate How to Connect External Monitor to MacBook Pro
If you’ve installed an external monitor and want to change the refresh rate of your monitor, you can do it manually in System Preferences.
You can also change the screen resolution. In some cases, your monitor may not support changing the refresh rate. To change the rate of your external monitor, you can deactivate the True Tone feature.
To make this possible, you need to open the Displays menu on your MacBook Pro and find the external monitor.
Fortunately, macOS includes a built-in feature that will find connected displays. The system will then display them on the screen. You can then adjust the refresh rate.
To adjust the refresh rate of an external monitor, navigate to the Advanced display settings menu and select the Monitor tab. Here, you’ll find a drop-down menu where you can select a different refresh rate.
You can change it to a higher or lower value depending on your preferences. To make sure that the refresh rate is the right one for your monitor, you may need to update the graphics card drivers. Also, you may want to decrease the resolution on your monitor if the refresh rate is too low for your needs.
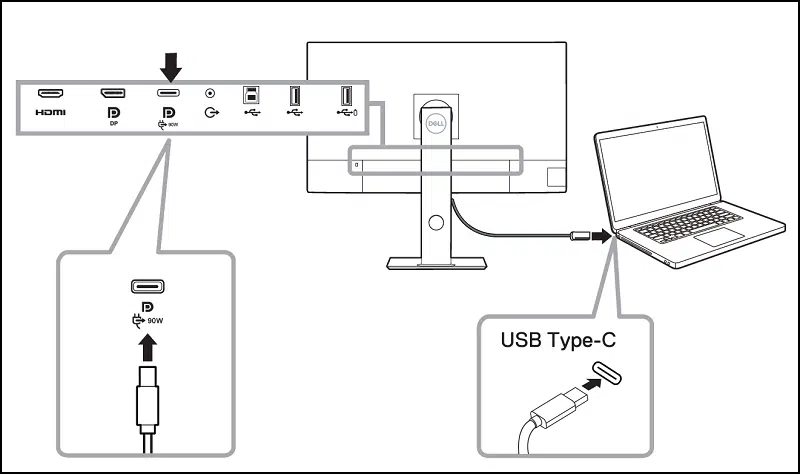
Find a cable:
If you’ve decided to connect an external monitor to your MacBook Pro, you’ll want to make sure it has the same type of ports as your Mac.
This way, you’ll have fewer cables to manage. However, you should check the cable to make sure it’s long enough for your needs.
The first step to connecting an external monitor to your MacBook Pro is to find a cable. This is usually an HDMI cable or a Mini Displayport cable.
The HDMI cable will connect to the monitor’s HDMI port, which is usually numbered. The Mini Displayport cable will connect to the MacBook’s Mini Displayport port.
Once you’ve figured out the right cable, try connecting your monitor to your Mac directly. If it doesn’t work, try connecting it to another computer.
If you can’t get the monitor to show up on your MacBook, you might need to try updating the firmware or software on your monitor.
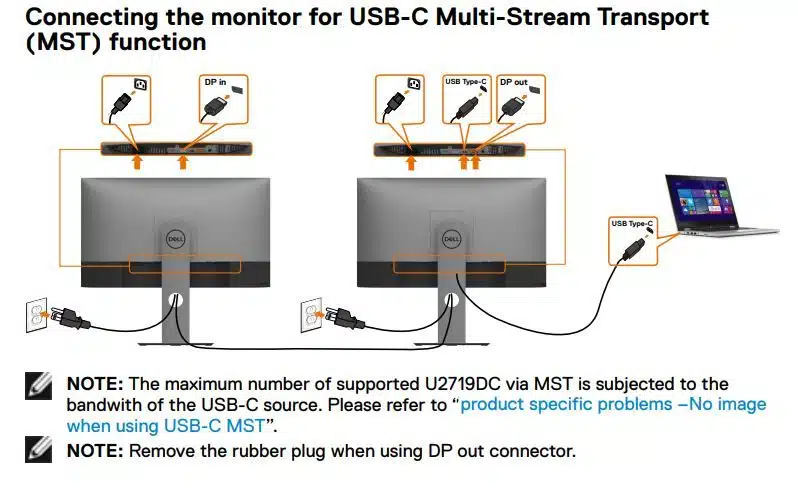
Set up display arrangement:
If you’re planning to connect an external monitor to your MacBook Pro, the first step is to set up a display arrangement in Mac System Preferences. In this menu, you can control the monitor’s orientation, refresh rate, and screen resolution.
Additionally, you can set up a mirror display to see the same display on both your MacBook display and your external display. Drag the secondary monitor icon to the appropriate side of the main display.
Once you have connected your external monitor to your MacBook Pro, you can choose whether to view it at its native resolution or scale it to match your monitor.
This is useful when you need to view a movie or work with a detailed photo or video editing. Changing the resolution can also make it easier to drag applications.
Once you’ve selected the resolution for your external monitor, you can start configuring it. You can do this by opening System Preferences and select Displays. Make sure the monitor is connected and that all the software on it is up-to-date.
If you have a MacBook Pro with an M1 chip, you must use the DisplayLink drivers to enable dual external displays.


Add comment