
Table of Contents
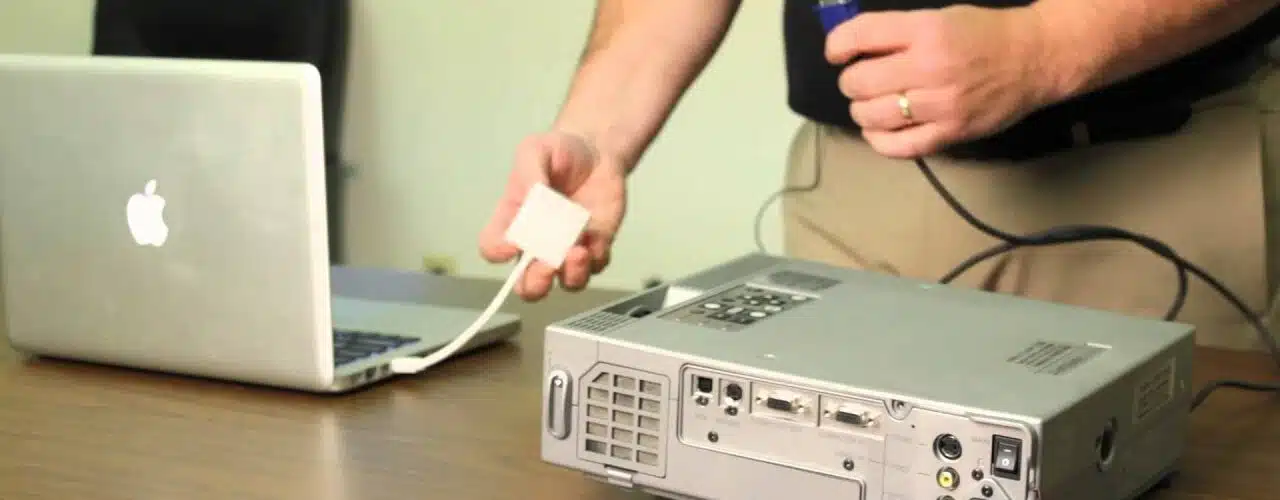
How To Connect Mac To Projector Using a Wired Connection?
How To Connect Mac To Projector? No matter, if you are presenting to an audience or just enjoying multimedia on a larger screen. Connecting your MacBook to a projector opens up new opportunities for sharing content and enjoying multimedia on a larger display. This step-by-step guide will show how to wired connect using an HDMI cable and an appropriate adapter.
Features Of Connect Mac To Projector
Whether you’re in a boardroom for a presentation or at home enjoying a movie night, being able to project your laptop screen onto a larger display is essential. However, the process can be intimidating for some. This article will demystify the steps involved and equip you with the knowledge necessary to seamlessly connect your MacBook to a projector.
There are several methods for connecting your MacBook to a projector, ranging from wired connections using HDMI or VGA cables to wireless connections via Wi-Fi, screen mirroring, or Chromecast. To start, it’s important to determine your Mac’s available ports and the input type required by the projector. Identifying the proper cable or adapter is crucial to ensuring a seamless connection. You’ll also want to be familiar with your Mac’s display settings and resolution.
The most common way to connect your MacBook to a projector is by using the AirPlay function. This method is simple and convenient, especially if your projector has built-in AirPlay compatibility or an Apple TV.
To begin, ensure that your Mac and projector are connected to the same Wi-Fi network. Then, open the Apple menu and select System Preferences > Displays. You’ll be able to adjust the resolution and other display preferences here to optimize your projection experience. Finally, be sure to keep both your Mac and projector up-to-date to ensure compatibility with the latest features. Once you’ve completed the setup process, simply click the Screen Mirroring button in the top-right corner of your MacBook (it looks like two buttons on top of each other, with one on the top switched to the left and the bottom one switched to the right) to begin your connection.
1. HDMI Port
One of the easiest and simplest ways to connect a MacBook to a projector is via an HDMI connection. Insert one end of an HDMI cable into an HDMI port on your Mac and one into an appropriate input on your projector. Ensuring both ends connect as advertised. Once this has been accomplished, your MacBook should recognize both devices automatically before continuing, You may need to adjust its display settings using the System Preferences > Displays dropdown ming.
Newer MacBook models often include built-in HDMI ports, while older models may need an adapter to connect. Your type of adapter depends on both your MacBook’s ports and connectors as well as what kind of connection is necessary on your projector. Apple offers user guides with helpful recommendations regarding which ports and adapters will be compatible with your MacBook.
If your Mac model doesn’t feature an HDMI port, a USB video adapter may help bridge the connection. Choose an adapter compatible with both your laptop’s USB port and the projector’s output ports – then plug the adapter’s other end into its HDMI or VGA input on the projector.
2. USB-C Port
Modern MacBook models often include USB-C ports that can be used to connect laptops to projectors. Though you will likely require an adapter – depending on your MacBook model, this could include either an HDMI or VGA adapter – to complete this connection. You will also require power cables for each device.
When connecting a Mac to a projector via USB-C. Both devices must run the same version of macOS; otherwise, issues could arise with their connection. You should also ensure both are on the same Wi-Fi network and screen mirroring mode – this can be accomplished by accessing your phone Bluetooth settings and activating discovery mode; after doing this you should see your projector appear among available devices; select it to initiate mirroring mode.
Once connected to your MacBook, you can adjust its display settings in System Preferences. Be sure to enable “Mirror Displays” under the Arrangement tab so that what appears on your laptop screen also displays on its projector display. Alternatively, connect the projector through its display output instead – but note this may reduce interactive pen functionality.
3. Thunderbolt 3 Port
Thunderbolt 3 ports on MacBooks are relatively new additions. Connected by USB-C cables, they enable high-speed data transfer, power delivery up to 100W, and quick notebook charging. For older devices like VGA displays or video cards that use older connectors such as VGA adapters plugging directly into their MacBook’s USB-C port.
If your projector supports HDMI, the most straightforward method of connection is with an HDMI cable. This is also one of the more commonly used methods.
But you could also connect to your projector via USB-C or Thunderbolt 3 ports; these offer flexible connectivity options and may come equipped with adapters built right into the projector itself.
An alternative method of connecting a projector is via an analog VGA connection, using either a VGA cable and adapter plugged into your MacBook’s VGA port or USB-C port (depending on its model).
Once your MacBook is connected to a projector, System Preferences allows you to configure its display settings. Under “Displays,” select the Arrangement tab, and make sure the “Mirror Displays” box is checked to enable screen mirroring. When this has been done, your MacBook should automatically recognize and display what’s on its screen on the projector screen.
4. Mini DisplayPort
Connect your MacBook to a projector using a wired connection for presentations, multimedia experiences, and more. To do so, gather all necessary equipment. Select an appropriate connection method based on available ports and projector inputs. Physically connect both devices and configure display settings before testing to ensure everything runs as expected.
If your Mac features a Mini DisplayPort connector, a Mini DisplayPort-to-HDMI or Mini DisplayPort-to-VGA adapter can help establish a VGA connection to a projector. Note that VGA connections may have length restrictions of 15 feet or experience flickering and other image quality issues.
Attach one end of the cable to your MacBook’s Mini DisplayPort port or adapter. And the other end to the projector’s VGA input. If your projector supports screen mirroring, your Mac should detect its connection and display its desktop onto the projector automatically. If not, open System Preferences > Displays and ensure “Mirror Displays” is ticked under the Arrangement tab before closing System Preferences again.
The steps outlined in this article should help you connect your MacBook to a projector without any difficulty, however. If any difficulties arise it is important to double-check physical connections. And adapters before adjusting projector settings accordingly for optimal results.
Conclusion
Whether you’re presenting to colleagues, hosting a movie night, or giving an academic presentation, the ability to connect your MacBook to a projector is invaluable. However, connecting your laptop to a projector can be intimidating for first-time users. Fortunately, it’s not as difficult as it seems. With the right knowledge, you can quickly and easily set up your projector to mirror your MacBook’s screen. This article covers the necessary steps to achieve a seamless connection, including gathering the appropriate equipment, determining the best connection method based on your ports and cables, physically connecting your MacBook to your projector, and configuring display settings. By following these simple steps, you’ll be able to deliver impactful presentations and immersive multimedia experiences in no time!


Add comment