
Table of Contents
How To Connect Printer To Laptop With Cable?
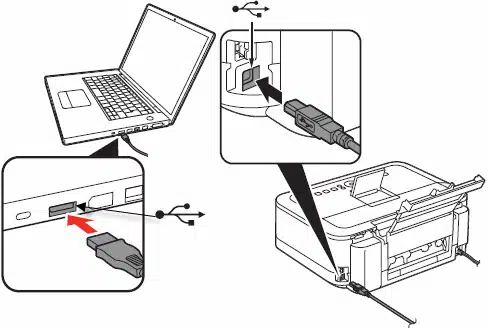
How To Connect Printer To Laptop With Cable? If you prefer to use your printer wired, most computers can connect directly with it using a USB cable. Just make sure your printer has a USB head, and that it uses a standard cable with the “A” side plugging into the computer and the “B” side into the printer.
1. Connect the Printer to Your Laptop:
A printer is a necessity for creating tangible documents and physical copies of digital files. While the process of connecting a printer to your laptop may seem intimidating at first, it is actually an incredibly straightforward task. In the majority of cases, all that is required is a single USB cable running from an available port on your laptop to the printer itself.
Before connecting the printer to your laptop, make sure that it is turned on and that the power cord is plugged in. It is also a good idea to have the printer’s driver installed, as this will help ensure that the connection is successful. Depending on the model of the printer, this may involve downloading and installing drivers from the manufacturer’s website. Some computers will do this automatically, but it is always worth checking just in case.
Depending on the model of your printer, it might use a standard USB-A or USB-C connector. The former is the more common type, and it is recognized by its rectangular shape. The latter, on the other hand, has a more rounded design and can be inserted into a port in any orientation.
If you have a Mac computers and a printer that uses USB-C, there are a number of adapters available on the market that will allow you to connect your device. For example, AUKEY’s two-pack of USB-C to USB-A converters costs around $15 and can be found on sale regularly.
2. Install the Drivers:
Before you can connect a printer to your laptop, you will need to install the drivers for it. Drivers are software programs that allow the operating system to communicate with the device, and without them, your printer will not be recognized. The procedure for installing the printer driver varies by manufacturer, but it should involve connecting the cable to an available port and running a simple setup program that will set up the printer.
You may also need to provide a network name for the printer. The printer’s hostname is shown on the network status sheet, or you can use its IP address. You can also choose to search for the printer by its name or type an identifier such as the printer’s manufacturer, model number, or MAC address.
Depending on the manufacturer of your computers, you may need to click the Start button and select Devices and Printers to open a window that allows you to add a printer. If the window does not appear, you can use a keyboard shortcut to open the Search box and enter Devices and Printers. In the resulting dialog, choose the Add a printer or scanner option and follow the prompts to add your printer.
Then you will be able to print from your laptop. If the printer does not show up in the list of available devices, you will need to install a driver manually.
3. Plug in the Cable:
If your printer doesn’t use Wi-Fi and still connects using a wire, there are a few different types of cable you can use. Most modern printers use USB connections, but if you have an older one, it may need a different type of cable. It’s best to check the printer’s documentation to find out which kind of cable you need.
If you’re using a USB cable, plug the round end of the cable into the port on the back of the printer, and the square end of the cable into your computer’s USB port. You can also connect the printer to a standard Ethernet cable if you have one available.
Before you connect the cable, make sure that both the printer and the computer are turned on and running. You can do this by opening the Windows Settings app and scrolling down to the option of Devices. Once you’ve found the option, click it.
You should see a new interface appear on your screen. In this interface, select Printers & scanners, and then click Add a printer. After that, follow the prompts to download and install the drivers for your printer. Once the drivers are installed, you should be able to print from your laptop without any problems. To test the connection, use a multimeter to measure the resistance between the plugs. If the reading is less than three ohms, the cable is connected correctly.
4. Test the Connection:
For most, connecting a printer to the computer isn’t a complicated process. It typically only requires a USB cable running from an available port on the laptop to the printer’s USB port. Network printers work differently but the process is still relatively simple.
If the printer is plugged in and turned on, but you can’t print. It’s likely that there is an issue with the connection. There are a few things you can try to resolve this problem. One option is to restart the printer and your computer. Another option is to use Windows PowerShell to check the printer’s IP address. To do this, open a command prompt and type ping followed by the printer’s IP address. The command will send messages to the printer and wait for replies. If you receive a response of “Request timed out. It means that the printer has a duplicate IP address and you need to contact your network administrator.
If you’re using a Mac, the process is even easier. All you need to do is make sure that the printer’s Wi-Fi or Bluetooth is enabled. And that both the printer and your computer are on the same network. Then, go to System Preferences and click on Printers & Scanners. In most cases, your printer will automatically appear in the list and you can start printing.


Add comment