
Table of Contents
How to Connect HikVision DVR to the Internet:
The first step is to create an ONVIF user. You can use any name you like as the username. Next, you will need to change the IP address of your router.
Once you’ve done that, you can view the live stream. If the live stream doesn’t appear, you may need to change your network settings or install additional software.
Create an ONVIF user How to connect HikVision DVR to the internet:
Hikvision cameras use the ONVIF protocol to connect to the internet. To enable this connection, you must create an ONVIF user on the camera.
After you’ve created an ONVIF user, you can proceed to add Hikvision cameras to your Hikvision DVR.
Log in to your HikVision NVR using its IP address. Then, click on the Configuration option. Scroll down to the Remote Configuration section and click on Onvif.
Enter the IP address of the camera and password. Once done, click Connect and Save. Once connected, the status of the device will change from red to green.
You can also enable the internet connection through your router. You can do this by using a router that supports ONVIF. Make sure that it has the proper ports for local and internet connections.
A good example is shown below. A router should have a port for both. Make sure to check whether the devices have the same IP range.
Modify your router’s IP address:
In order to connect your HikVision DVR to the internet, you will need to configure your router’s IP address. It’s important to keep in mind that the external IP address of your router is not permanent.
It may change from time to time due to power loss or other factors. This can prevent you from accessing your HikVision DVR remotely.
After you’ve modified your router’s IP address, log in to your HikVision account. Once there, you should see the status of the network connection as Normal.
If, however, you’re getting the error “connection to server failed”, you may want to try disabling your DDNS settings for about an hour. Then, you can re-enter the DDNS configuration fields. This should clear up the false error.
To modify the IP address of your router, you need to go to the TCP/IP Setup screen. There are fields for the internal IP address and port forwarding address of your router. Enter your HikVision DVR’s IP address in the IP address field and click OK.
Configure a static IP address:
If you’re wondering how to connect your HikVision DVR to the internet, the first step is to set up a static IP address.
It’s a fairly simple process and can be done in just a few minutes. The DVR will need to be plugged into the internet using a router that supports port forwarding.
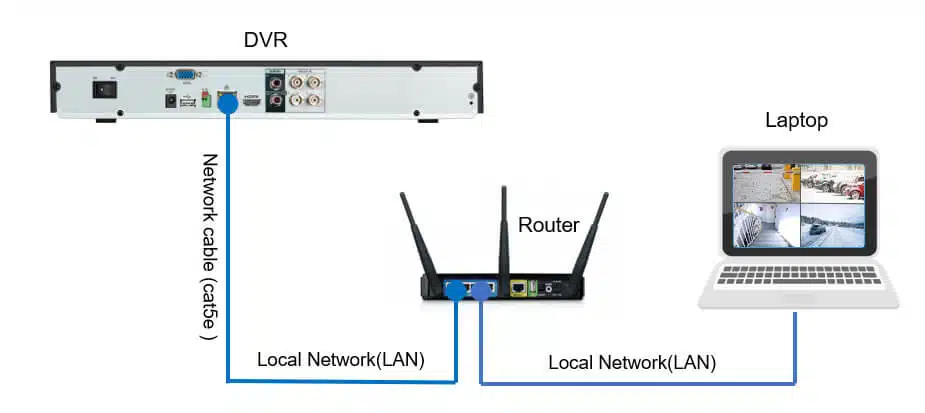
To access your Hikvision DVR through the internet, connect it to a monitor or to your router. Log in as an administrator and tick the “DHCP” box.
Your laptop must also be physically connected to the network, and have an IP address within the network range.
Next, go to the TCP/IP setup screen. Select the IP config setup and make sure you’re on port 8000. The JPEG DVR used port 50000, but that version is no longer supported.
View the live stream:
Hikvision’s web portal has a feature that allows you to view the live stream of your surveillance system without special software.
However, it doesn’t work for all users, and you can’t use this feature on every device. If you encounter this problem, there are a couple of steps that you can follow.
First, you should understand the difference between a mainstream feed and a substream feed. A mainstream feed has a higher resolution but requires a higher bandwidth.
A substream, on the other hand, has a lower resolution and can run on a regular Internet connection. However, if you are on a low-bandwidth connection, it’s probably better to go with the substream.
If you don’t have a dedicated video capture device, you can still view the live stream on a Hikvision DVR.
To do this, you’ll need to install a plugin on your computer that can run on Windows. Hikvision’s video management software allows you to add cameras using IP addresses and credentials. From there, you can view live video and adjust the settings of the cameras.


Add comment