
Table of Contents
How to Connect Laptop to TV Wirelessly With Windows 11?
How To Connect Laptop To TV Wirelessly Windows 11? If you need a bigger screen to give a presentation or watch movies on your Windows laptop, you can easily connect your computer to your TV wirelessly. This is easiest if both your laptop and TV have HDMI ports. If your laptop doesn’t have HDMI, you can use a VGA cable, but this only carries video and not audio.
HDMI Port:
Most laptops have an HDMI port, which stands for High-Definition Multimedia Interface. It is a small rectangular plug that transfers digital audio and video signals between devices. This port is also commonly found on TVs, which can connect to computers for screen sharing. The easiest way to do this is by using an HDMI cable, which connects one end to the computer and the other to the TV.
However, if you want to avoid having to deal with cables, there are several ways to connect your laptop to your TV without an HDMI connection. These methods include using a wireless display adapter, or a Chromecast or AirPlay device (for Apple products).
The first thing you need to do is enable mirroring on your TV or projector. This is usually done by selecting the appropriate option in your TV’s settings menu. You can also use an app such as Google Chrome or AirPlay on your laptop to stream content directly to a TV.
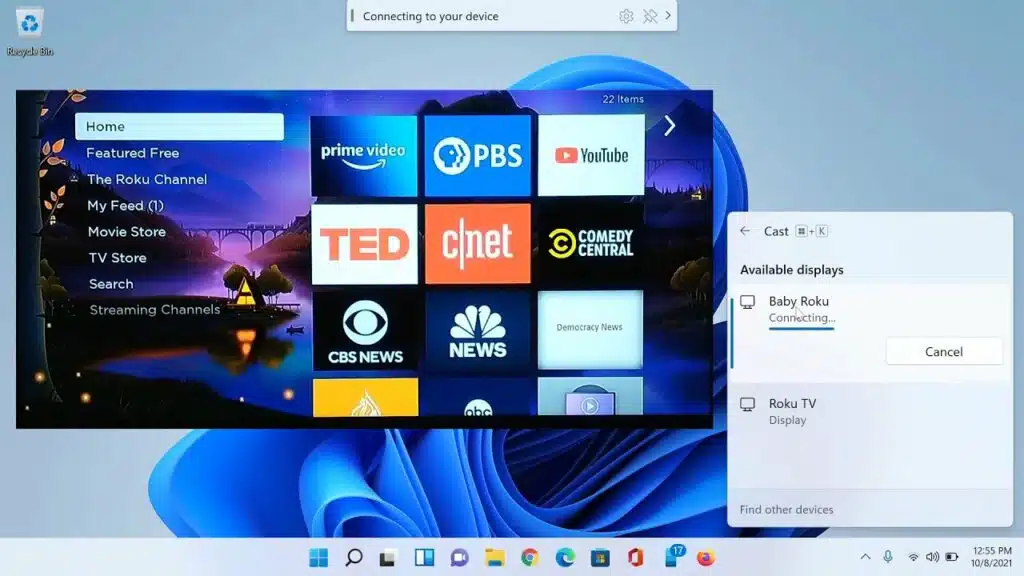
Next, you need to make sure that your laptop and TV are both connected to the same Wi-Fi network. You can then launch the Cast dialog box by pressing Windows + K or opening the Control Panel and selecting “Display”. Then, select your TV from the list of available displays. If you are prompted to enter a code, follow the on-screen instructions to complete the process.
USB-C Port:
When it comes to connecting a laptop to a TV wirelessly, there are several different methods that you can use. These include the use of HDMI cables, Wi-Fi, and Bluetooth. Regardless of which method you choose, it is important to make sure that your computer and television are both connected to the same network. This will ensure that you can connect to your television without having any issues with connectivity or streaming.
The easiest way to connect your laptop to a TV is by using an HDMI cable. However, if you don’t have an HDMI port on your laptop, you can still use a USB-C to HDMI adapter. Just make sure that your TV and laptop are both compatible with the adapter.
Another option is to use a Miracast or DLNA device to connect your laptop to a TV. Both of these devices allow you to mirror your laptop’s screen on the TV, and both work well with Windows 11. To use a Miracast or DLNA connection, navigate to Settings > System > Display on your laptop. Then click the Connect to a wireless display link, and select your TV from the list of available displays.
You can also cast media files directly from the File Explorer or Windows Media Player. Just right-click on the file and select the option “Cast to Device.” You can also cast content from many popular websites, such as YouTube, Netflix, and Spotify.
Wi-Fi:
If you are using a laptop that has an HDMI port, then connecting it to a TV is easy. Simply plug one end of the HDMI cable into the TV’s HDMI port and the other into your laptop. You can then use the TV’s remote to change the input source to match the cable connected to your laptop. This will allow you to view your laptop screen on the large television.
If your laptop does not have an HDMI port, you can still connect it to a TV with a wireless connection. To do this, first, ensure that your laptop and TV are both on the same Wi-Fi network. Then, navigate to the Settings app (via a pinned app on the Start menu or by searching for it). Click the Connect to a wireless display link to reveal the Connect pane. This will allow you to choose between Duplicate, Extended, and Second screen-only modes.
Alternatively, you can also use a third-party program to mirror your laptop’s screen on the TV. Such programs include AirParrot and AirServer, which support various screen mirroring options. Moreover, they are compatible with most of the latest laptops and have a simple setup process. You can download these programs for free from the internet. However, they don’t offer as many features as the built-in Windows 11 tool.
Bluetooth:
If your laptop has an HDMI port, you can use it to connect to your TV wirelessly. This method is simple and easy to set up and works with most TVs. You just need an HDMI cable that is certified to support your laptop’s screen resolution and refresh rate. A standard 18Gbps HDMI cable should work for most screens, but if you’re using a high-definition or 4K display, you’ll need a 48Gbps HDMI cable.
To enable wireless projection, first ensure that both your laptop and TV have a Wi-Fi connection. Then, open the Settings menu on your laptop and navigate to System > Display. Click the Connect to a Wireless Display link under the Multiple Displays section. Select your TV from the list of available devices, and follow the prompts to connect.
Some laptops also have an integrated Miracast receiver, which makes the process even easier. However, if yours doesn’t, you’ll need a wireless HDMI adapter. There are several models available, including Microsoft’s own Wireless Display Adapter, and it’s best to purchase an adapter that supports HDCP, as this will prevent any copyrighted content from being displayed on your TV.


Add comment