
Table of Contents
How to Connect One Printer to Two Computers With Network – Windows 10?
How To Connect One Printer To Two Computers With Network – Windows 10? If your printer is already connected to a network and shared from another PC. It’s easy to connect to the device on other computers in your home or office. Just click Start, type “devices and printers,” and select the result.
If the PC you’re using isn’t a member of your home group. You might see a screen asking you to join it. Follow the on-screen instructions to finish the process.
1. Connect the printer to the first computer:
There are many different ways to connect a printer to two computers. One way is to use a USB cable. The next way is to use a network. This method requires a router with an Ethernet port. You will also need a wireless printer that supports Wi-Fi. Once you have the printer connected, you can share it with other computers on your network. This is a great way to print documents from anywhere in your home. The process is very easy and only takes a few minutes.
You should start by ensuring that the printer is turned on and ready for use. It’s a good idea to double-check that all of the wires are in place and that everything is working properly. If you’re using a new printer, be sure to read the instructions that came with it. This will help you understand how to set up and install the device.
How To Connect One Printer To Two Computers With Network – Windows 10?
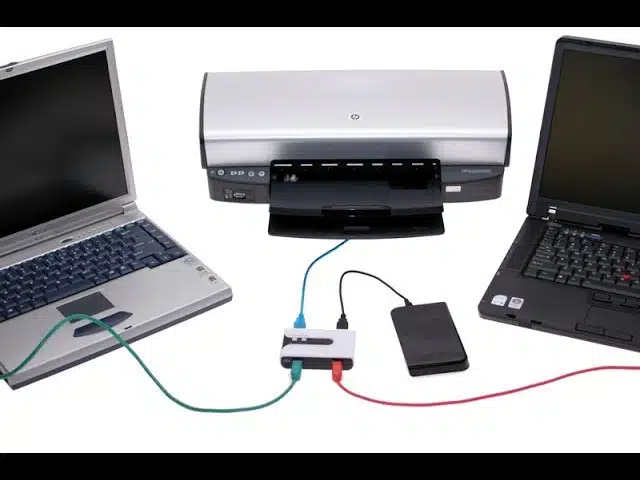
If you are connecting the printer to your computer using a USB cable. You’ll need to make sure that the cable is connected correctly. Most printers have USB ports that work with both Type-B and Type-A cables. The connections may vary depending on the model of the printer. If your computer doesn’t have a USB port, you’ll need to buy a USB hub or adapter.
The second step is to enable sharing on the first computer. Network and Sharing Center > Advanced sharing settings > Turn on file and printer sharing. Settings and select the device to open its properties.
You can also right-click the printer and choose “Printer properties” to set up sharing. Once you’ve done this, you can click the “Sharing” tab and edit the name if desired.
2. Connect the second computer to the printer:
Printing from multiple computers on a network is a common use for modern computer systems. This can offer financial savings and productivity gains, eliminating the need to print documents on multiple printers. It is also helpful in home environments. Where several users may need access to a single printer without the inconvenience of moving it between devices. Many modern operating systems, including Windows and Macintosh, have a built-in feature that makes sharing printers across a network easy.
How To Connect One Printer To Two Computers With Network – Windows 10?
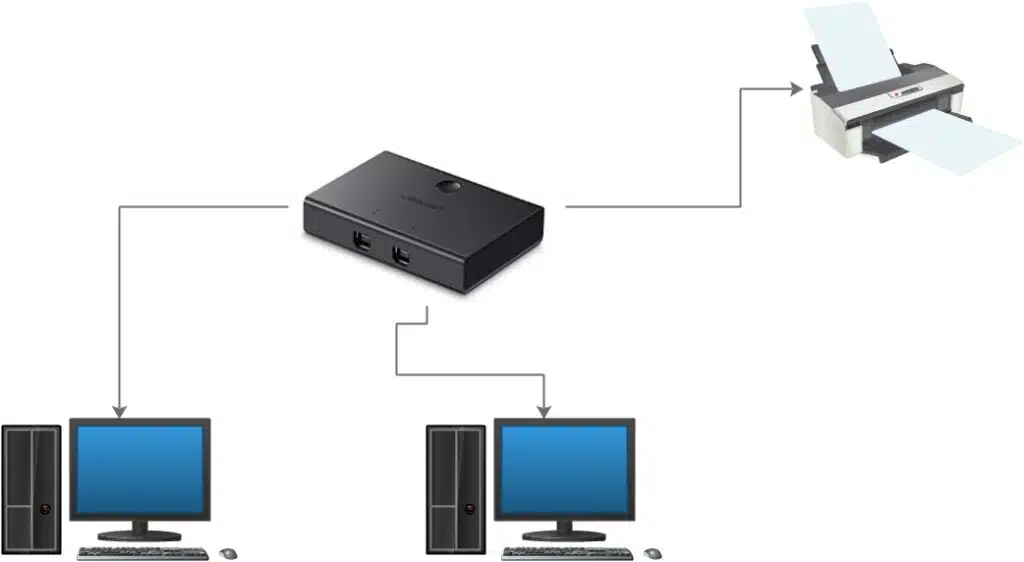
The easiest way to connect two computers to a shared printer is to use a USB cable. This type of cable can be purchased at most electronics stores. Simply plug one end of the cable into the printer. And the other end into each of the computers that you want to share the printer with. This method only works if the two computers are close enough to communicate over the USB cable.
Another option is to create a computer-to-computer network. This is typically used in businesses, but it can be useful for small homes as well. To do this. Connect a crossover network cable from one. Of the network ports on the first computer to one of the network ports on the second computer. Once connected, the second computer should be able to find the printer when using the Add Printer Wizard.
If the second computer cannot locate the shared printer. It is likely because the printer has not been configured as a network printer on the first computer. In this case. The second computer will need to install a printer driver from the CD-ROM that came with the printer. If you are unsure of how to do this, follow the instructions provided by the manufacturer of the printer.
3. Connect the printer to the network:
If you are using a USB printer on a network. There are several ways that you can connect it to other computers. You can use a network cable, which is much more reliable than a USB cable. Or you can set up the printer to share with other computers on your network. This method requires that the other computers be able to access the shared printer on the host computer. You can do this by turning on file and printer sharing on the computer that the printer is connected to. Then. Other computers on your network can access the shared printer by selecting. It is from the list of available resources in Windows Explorer or Printers and Faxes.
If your network has a wireless connection. You can also connect the printer to the network using a wireless USB cable. This is a more convenient option because you can print from any location. The network where there is an open wireless connection. However. It is important to note that wireless USB connections. Can be affected by interference from other devices such as smartphones, tablets, and laptops. You may need to adjust your printing settings to reduce interference. Or you may need to install a different driver for the printer.
Another way to connect a printer to the network is to use a print server. A print server is a device that connects to your router and allows multiple computers. On your network print to the same printer. Print servers are available from many manufacturers, and some even include a built-in Wi-Fi or Ethernet connection. You can find a print server that meets your needs by browsing the internet. Or consulting with a managed IT service provider. You can also use a regular router to connect a wired or wireless printer to the network.


Add comment