
Table of Contents
How To Connect Printer To Network – Windows 10?
How To Connect Printer To Network – Windows 10? Many printers are compatible with Wi-Fi and can be connected to your home network. If your printer isn’t already set up to connect over Wi-Fi. Follow the instructions in the printer manual to set up a wireless connection.
On the computer, if you want to use the printer, open Settings and click Add a device. Windows will scan for devices on your network and list any found.
How to Connect a Printer to a Network?
Adding a printer to your network in Windows 10 is usually a straightforward process. However, there are some things to keep in mind. The first is that your printer must be connected to the same. Network as the PC that will be sharing it. This is typically done wirelessly or with a USB cable, depending on the printer and its configuration. In addition, the printer must be turned on and ready to print.
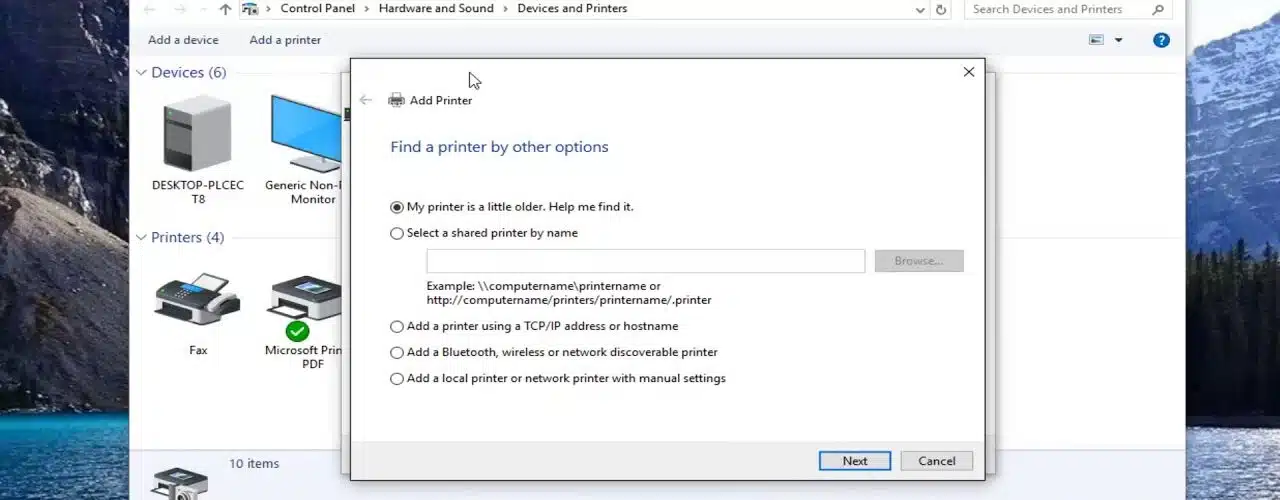
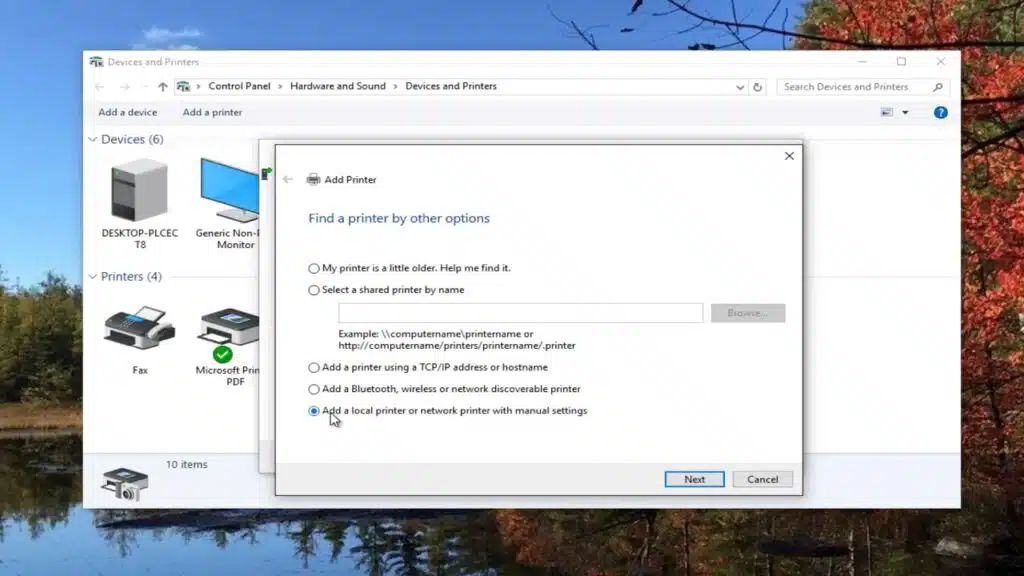
If your printer is not automatically detected by Windows, you will need to set it up manually. This will involve going to the printer menu, configuring a TCP/IP port, and installing the drivers. Follow the steps below to add a network printer in Windows 10.
Start by opening the Start menu. This is the button in the bottom left corner of your screen that looks like a Windows logo. Then click the gear-shaped icon. Select Devices. This is in the middle of the menu. Then select Printers & scanners.
If the printer is a Wi-Fi-connected model, make sure that it is powered on and is connected to your network. Next, ensure that it is open to new connections and that the wireless settings are configured properly. Finally, follow the instructions on your printer’s manufacturer’s website to connect it to your wireless network. Once the printer is connected, it should appear in your list of available devices.
How to Share a Printer on a Network?
Depending on the printer and your network configuration, getting it up and running can be fairly easy. In most cases. If the printer is directly connected to one computer and set up as a shared device on that machine. It should automatically show up when you open “Devices and Printers” on any other networked computers. All you have to do is select it from the list, click Install, and follow the onscreen prompts. The rest of the process is handled by Windows, which will download. Any drivers necessary and ask you to give the printer a name.
This method also works if the printer is shared as part of a Homegroup. Just make sure that the PC that is connected to. The printer is a member of that home group. And any other PCs on your network should be able to print to it.
If you don’t use Homegroup, or if you have older PCs on your network. That doesn’t support it, things are a little more complicated.
You can still share a printer on your network by following the steps outlined above, but you’ll have to use traditional file and folder sharing on each of the networked computers. In this case, you’ll probably want to install the driver on each computer before attempting to add it to the Printers and Scanners menu in Windows.
How to Add a Printer to a Network?
Printers that are connected to the network are called network printers. If the printer is physically connected to a computer on your network, it should automatically appear in the list of available printers when you click the Add a printer or scanner button in Windows 10. In this case, you don’t need to install the driver for the network printer.
However, if you have a wireless printer that isn’t currently on the network, you’ll need to connect it so that other computers can use it. The process for doing this varies between manufacturers and types of printers, so check the instructions that came with your printer or the manufacturer’s website for more information.
If the printer is a wireless model, you’ll need to press and hold its setup button for 3 seconds or more to activate it. Then, follow the on-screen prompts to finish setting it up. In most cases, you’ll need to enable wireless printing on your router before adding the printer to the network.
If the printer is a wired model, you’ll need to connect it using an Ethernet cable. Once the printer is connected, turn on file and printer sharing on the target computer. You can do this by selecting the printer and then clicking Printer properties, selecting the Share tab, and choosing the Enable sharing option.
How to Remove a Printer from a Network?
Printers connect to computers in a variety of ways, from directly by a data cable (such as USB) to over a local area network using cables or wireless radio (such as Wi-Fi). Regardless of how a printer is connected, it needs a driver, which is software that teaches your computer, tablet or phone how to use the device. A driver allows a printer to print and perform basic tasks, but it also controls the printing process.
If you are on a PC running Windows 10, you can use the built-in printer wizard to connect a wired or wireless network printer. Select Add a printer or scanner and click Next. If the printer isn’t detected, select The printer that I want isn’t listed and enter the network path or hostname. Then, select the printer and follow the on-screen instructions to complete the process.
On a Mac, you can connect a wired or wireless network printer to your Mac by opening System Preferences and selecting the Printers & Scanners pane. For a wired connection, insert one end of an ethernet cable into the printer’s LAN or network port and the other end into an available network port on your router.
If you can’t connect a shared printer on your network, it may be that the other user hasn’t turned on or configured their permissions in System Preferences. You can also try removing the printer and reinstalling it from scratch.


Add comment